Performing a physical inventory allows you to count every part that is in your dealership. This is essential to keep accurate counts of the parts that are on hand and ensures that the part costs are correct.
Check the Parts Inventory Value
Access Physical Inventory
- Open the Parts & Service module.
- Select the Tools menu in the upper left of the screen.
- Hover over Parts Tools to open the submenu.
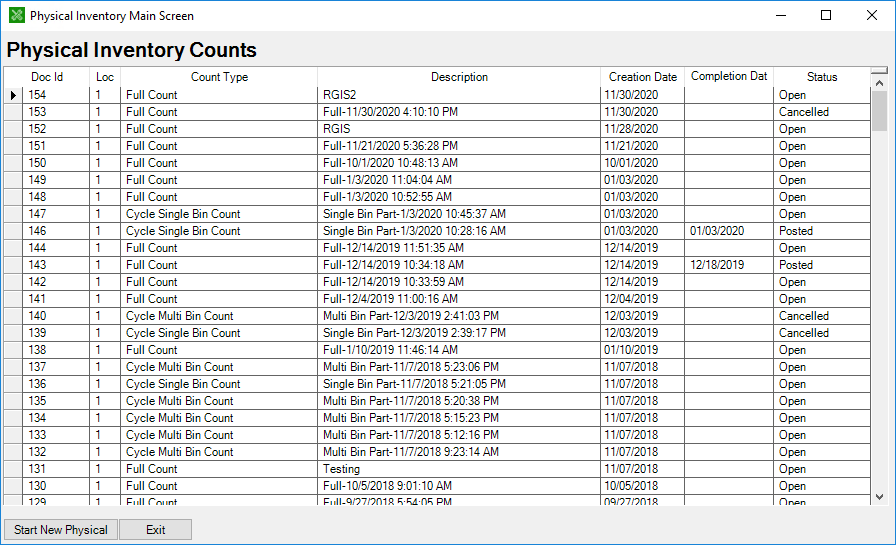
- Choose the Physical Inventory option. This will open the Physical Inventory Main Screen. It will show a list of physical inventories. You can recall a previous physical inventory count by double clicking on the row or start a new count by clicking on the button in the bottom left of the screen.

Start a New Physical Count
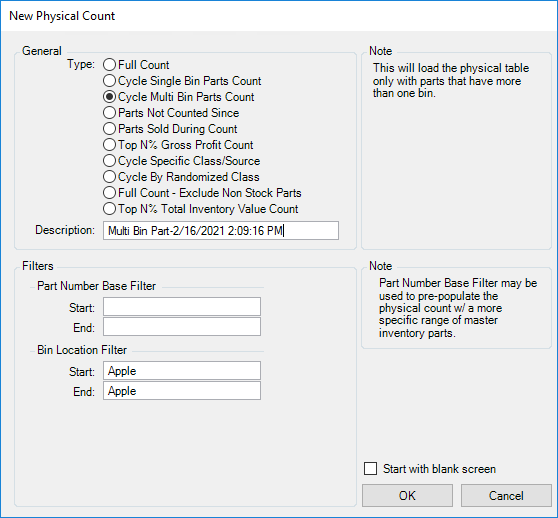
- Choose to start a new physical count. The New Physical Count window will open.
- Select the type of count. The options are:
- Full Count - allows for a full End of Year (EOY) inventory count.
- Cycle Single Bin Parts Count - loads parts assigned to the single bin selected in the bin location filter
- Cycle Multi Bin Parts Count - loads the parts that exist in more than one bin
- Parts Not Counted Since - will initially load parts that haven't been counted since a specified date
- Parts Sold During Count - loads parts that were sold during a prior physical inventory count
- Top N% Gross Profit Count - pre-loads parts that have a specified percentage of gross profit
- Cycle Specific Class/Source - will initially load parts assigned to the specified Class or Source
- Cycle By Randomized Class - loads parts based on a random class. You can choose specific classes to include as part of the count.
- Full Count - Exclude Non Stock Parts - pre-loads all parts that do not have the Non Stock box checked on the part profile.
- Top N% Total Inventory Value Count - loads the highest inventory value parts based on your selection of the price or cost.

|
This example is:
|
Once you choose the type of count, the description will default to a name that combines the type of count and date/time stamp. You can edit this, if desired.
Optionally, you can filter based on part numbers or bin locations to give you a more specific range of inventory parts.
If you wish to start the physical count with no parts displayed to allow manual entry, check the option to start with a blank screen.
Enter Count
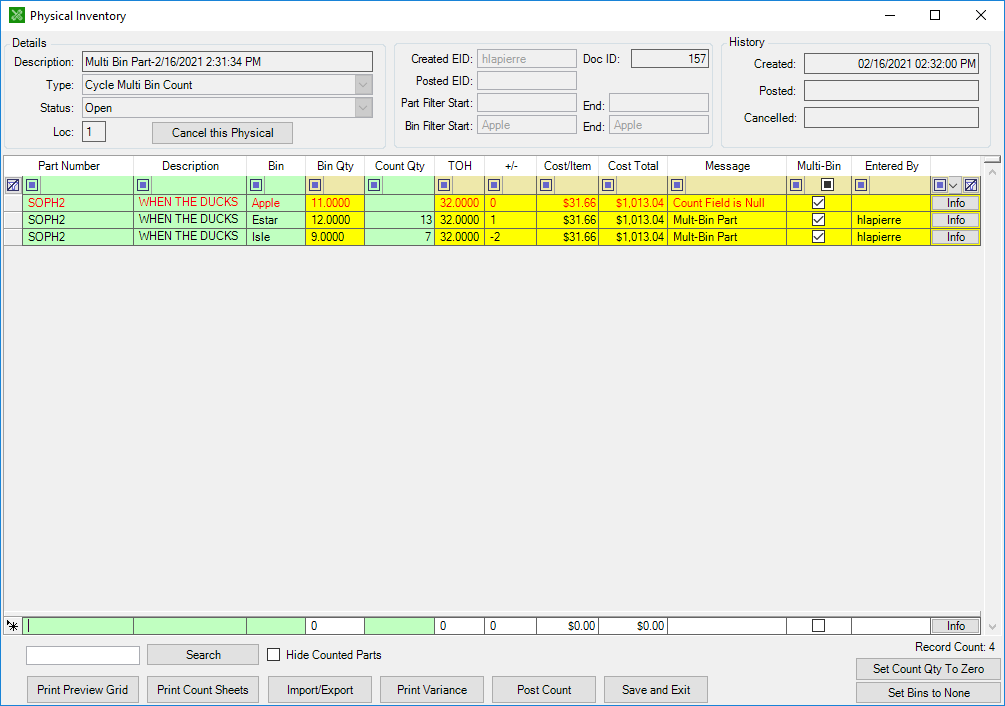
- Click OK. This will start the physical and open the physical count window. The relevant parts will show based on the criteria selected from the previous screen.

- Enter the quantities on hand into the Count Qty column. As you enter in your count, the text color will change from red to black.
Optionally, you can update the bin location of parts by selecting the Bin and selecting from the drop down.
Note- If any parts are listed in red on the list, you will need to address the error displayed. All errors must be resolved before the final counts can be posted.
If you can’t finish your entries in one sitting, simply click the Save and Exit button. This will save what you have entered and exit out of the count. When you open the physical again, the values will still be saved and you can continue the input.
Additional Tools
In the bottom right corner of the Physical Inventory window are two additional tools available to help with your physical inventory count.
- Set Count Quantity to Zero - If there are multiple parts that state "Count Field is Null" and those parts are not in inventory and should be set to zero, click this button and it will fill in "0" in the Count field for all parts that do not contain a numeric value.
- Set Bins to None - If a part does not have a bin assigned to it and the user does not wish to assign it during the count, they may click this button and the system will assign the bin “None” to it.
Post Count
It is a good idea to run a parts variance report both before and after you post your physical inventory count. Click on the Print Variance button at the bottom of this window to print the Physical Inventory – Variance Report.
- To push the part counts to the Master Inventory, click the Post Count button.
IMPORTANT- Once you post the count, it cannot be undone.
Check the Parts Inventory Value
After the Physical Inventory counts have been posted, you will need to update the accounting parts inventory value.
- Open the Reporting Module.
- Open the Accounting reports folder.
- Open the General Ledger reports folder.
- Select the Inventory Values by GL Number report.
This report will show the difference between your recently updated parts inventory value and the accounting parts inventory value. Please be sure to consult with your accountant before making this entry to ensure it is the best course of action for your dealership.