The Infinity program allows you several different ways to create a new parts invoice. These are:
(102) New Invoice
Each option offers different functionality and reasons to use, but all of the screens look the same. This article will review:
Steps to Add a New Parts Invoice
Steps to Add New Parts Invoice
- Open the Parts & Service module.
- Select the (102) New Invoice option from the menu tree on the left side of the window. This will open a new, blank parts invoice.

- Search for the customer in the Entity Information section at the top of the invoice. You can search by different criteria like last name, phone number, or unit. If this is a new customer, click the Add/Modify Entity button to enter their information. If this will be used on a unit owned by the dealership, click the Apply Internal button.

- Add the desired parts to the table. You may enter the part number by typing into the Part Number field. If you are unsure of the part number, you can search for parts by using the Search Parts button at the bottom on the invoice.
- For each line, enter the quantity sold.
- For each line, enter the quantity relieved.
Note: If this is an internal ticket for a dealership vehicle, it is required to select the vehicle for each part line.
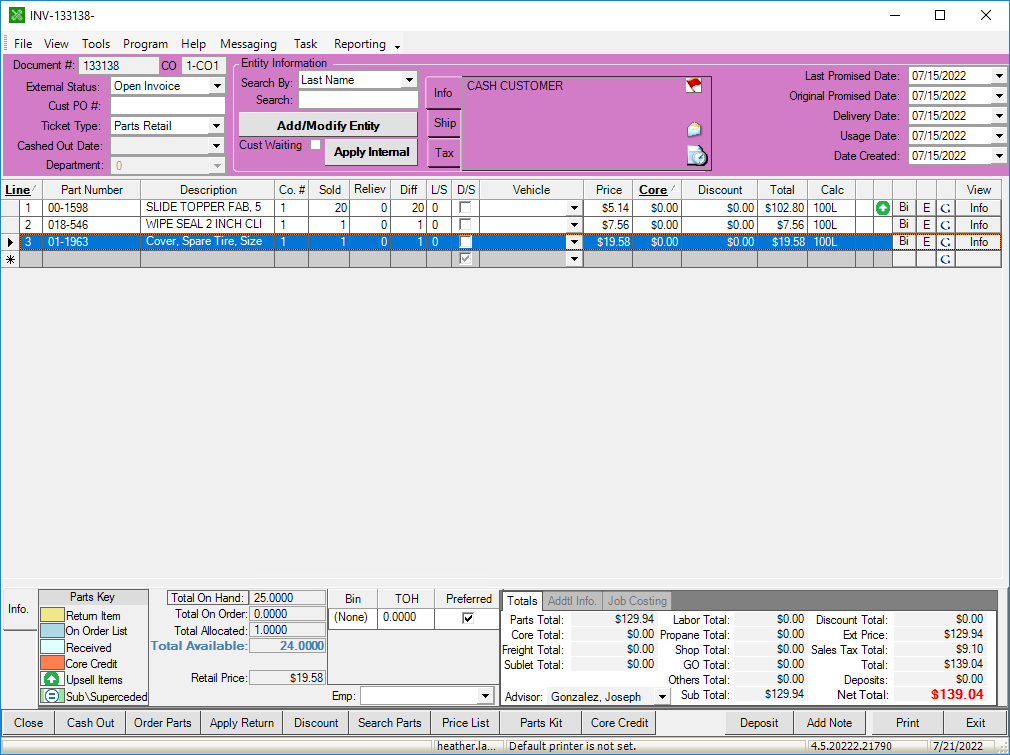
At the bottom of the screen, information about the highlighted part will show to the left, while a breakdown of the ticket will show to the right.

- If you have finished adding all parts to the invoice, select the Cash Out button. This will open the sales register screen.
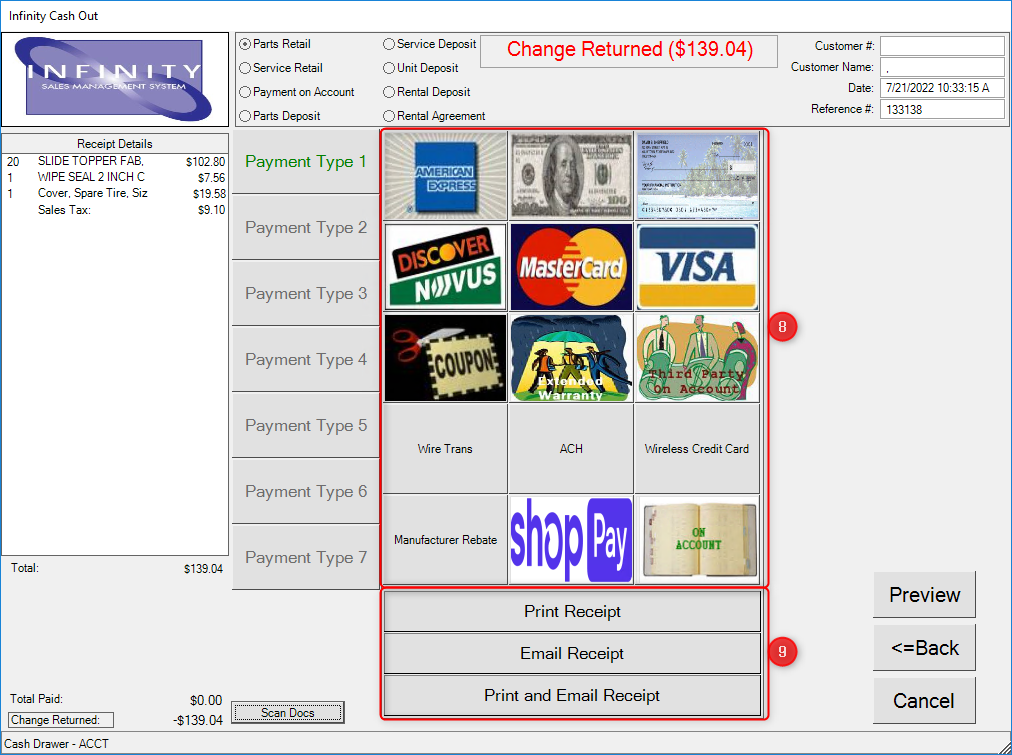
- Choose the customer's payment method by clicking over the relevant payment type.
- Complete the transaction by choosing to print the receipt, email the receipt, or both.
Parts Invoice Screen
Header Information
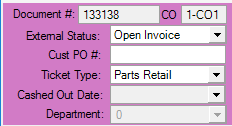
Document Number
This field shows the quote or invoice number. This number is automatically created by the program and should not be edited.
CO
This field will show the company abbreviation for the location of the parts invoice.
External Status
The status shown here will indicate if this is a quote or an estimate, an open invoice, or closed.
Customer PO Number
If the customer has a purchase order number you wish to show on the printed invoice, enter it into this field.
Ticket Type
This field will automatically populate.
Cashed Out Date
Once you have cashed out an invoice, the date will automatically show in this field.
Department
This field will automatically populate with the accounting department.
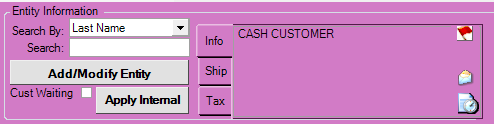
Entity Information
Search By
Choose how you wish to search for the customer. Options include:
|
|
|
Search Term
Enter the term you wish to search. For example, if the Search By field is set to Last Name, you would type the customer's last name into this field. Once entered, tap the Enter key to search.
Add/Modify Entity
If this is a customer new to your dealership, click this button to add their information. If you choose this button after choosing a customer, it will open the customer profile to allow viewing and editing.
Customer Waiting
Check this box to have the waiting status show in the invoice list.

Apply Internal
Click this button if the parts are for a vehicle owned by the dealership. You will need to select the applicable unit on each part line.
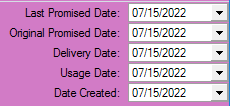
Each of the date fields will automatically populate with the day that the invoice was created. You can adjust these dates based on your dealership needs.
Last Promised Date
(Rarely used for parts invoicing) This date can be set to the latest expected date that the parts will be supplied.
Original Promised Date
(Rarely used for parts invoicing) This date can be set to the first expected date that the parts will be supplied.
Delivery Date
If your dealership is drop shipping parts from a manufacturer, you may enter the estimated delivery date in this field.
Usage Date
(Rarely used for parts invoicing)
Date Created
This field will automatically show the date that the invoice was started.
Parts Table Columns
Line
This field will show the line number of the part.
Part Number
This field shows the part number. You may enter a part number into this field to add a part.
Description
Once a part number has been entered, the part description will show in this field.
Company Number
Thee company number (from the header) will show in this field.
Sold Quantity
Enter the quantity that the customer is purchasing.
Relieved Quantity
Enter the quantity that you have taken out of inventory.
Difference
Until parts are relieved, the difference column will show the difference between the sold quantity and the relieved quantity.
L/S
If the customer no longer wishes to have the part, enter the quantity into the Lost Sale column instead of the relieved quantity column. This helps track lost sales on the master inventory part profile.
D/S
Check this box to designate this part as a drop shipped part. You will also need to verify that the shipping address is entered in the entity information section.
Vehicle
It is best practice to select the unit for each part line for customers. It is required to select the unit for internal tickets.
Price
The price for an individual part sold will show.
Core
If the part has a core amount entered in the master inventory part profile, it will show in this field.
Discount
Enter a discount amount into this field.
Total
The total part price will display. This is a calculated field based on the calc field, the quantity, and discounts.
Calc
The calculation here will depend on the pricing matrix level applied to the customer.
Upsell
If other parts are usually sold with this part, you will see a small green arrow (view in key). Click this arrow to view the upsell items.
Bin
If this part is in more than one bin, click this button. You will receive a popup where you can enter the quantity for each bin from which the part is taken.

E (Employee)
Click this button to change the salesperson for this specific part.
G (Google)
Click the G button to open a Google search for the part number. This can be helpful to show the part to the customer.
Info
Clicking the info button will open the master inventory part profile.
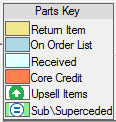
Parts Key
This section is a key to the different line colors and icons that can show on the part lines.
Part Information
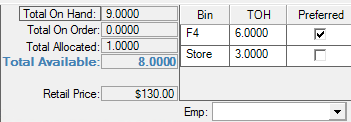
Total On Hand
The quantity on hand in the dealership will show here.
Total On Order
The quantity on purchase orders will show.
Total Allocated
The quantity reserved by part or service invoices.
Total Available
This field calculates the available quantity by subtracting the quantity allocated from the total on hand.
Retail Price
The part's retail price will show. This price is entered in the master inventory part profile.
Bin Locations
This section will show the bin location or locations where the part can be found. These bins are assigned on the master inventory part profile.
Invoice Buttons
Close
Selecting to close an invoice will mark it as done and move it to the centralized cashier to allow them to take any owed money.
Cash Out
Clicking the cash out button will close the invoice and open the point of sale to allow you to take payment.
Search Parts
Selecting this button will open the Part Search window to search the Master Inventory for a part.
Price List
Clicking this button will open the price book to allow you to search for a part that may not be in your inventory.
Parts Kit
Click this button to select a parts kit to add to the ticket. If parts kits have been created, you can add several parts at once.
Core Credit
If cores have been added to previously-sold parts and the customer is returning an old part, you may click this button to enter the selling invoice number to apply the core credit.
Deposit
Select this button to apply a payment to this invoice. You will be prompted to enter the amount paid, then progress to the point of sale to take the payment and print or email the receipt.
Add Note
Choosing this button will allow you to enter a date and time-stamped note onto the customer's profile.
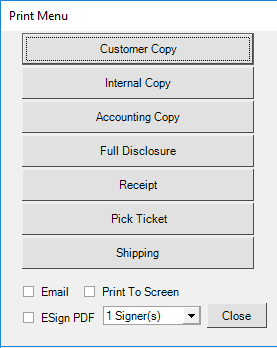
Clicking this button will open a popup window where you can choose which document you wish to print, email, or preview.
Exit
Click this button to save and exit the invoice.