At the end of each year, counting all inventory on hand is performed to ensure that the business begins the new year with accurate numbers and inventory cost. This guide will provide the steps to follow to perform an accurate and complete physical count.
Steps (Summary)
|
Run Physical Inventory – Full Count Count all parts Enter count quantity Run Variance Report Fix any issues Set Count to 0 Set Bins to None Post Count |
Run new physical for Items Sold During Count Count all parts Enter count quantity Run Variance Report Fix any issues Set Count to 0 Set Bins to None Post Count Run the Inventory Values by GL Number report Adjust GL Balance to Match Inventory value, if there is a difference. Optional – Perform the Obsolete Parts Process |
Run a Physical Inventory
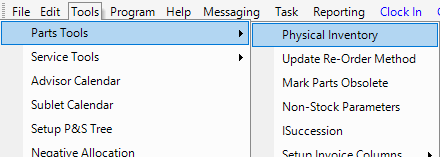
- Open the Parts & Service module.
- Select the Tools menu in the upper left of the screen.
- Hover over Parts Tools, then select Physical Inventory. This will open the physical inventory main screen.
- To start a new physical inventory count, click on the Start New Physical button in the bottom left of the window. This opens the new physical count options screen.
- Choose the option for a Full Count.

- If desired, you may update the description of the inventory count. By default, it will fill in the date and time that the inventory count was started.
- Click OK. This opens a screen that shows a list of all parts in the software.
Count all parts
Now it’s time to count the parts. There are several different ways to do this, including printing count sheets or by using the parts scanner in the Motility mobile app.
Print Count Sheets
- If you’re still in the screen where we stopped in the steps above, you can click the Print Count Sheets button in the lower left of the screen.

If you have left the inventory list screen, you can open the Reporting module, choose the parts reports, then select the Physical Inventory reports, then choose the Physical Inventory Sheets.
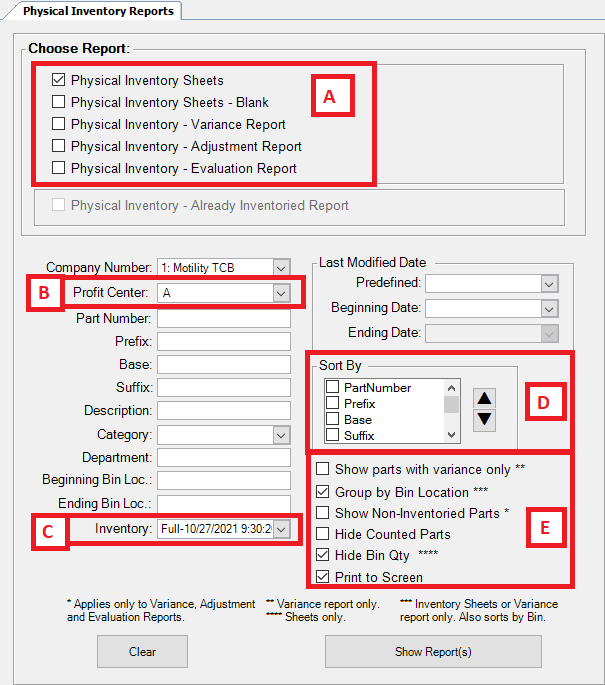
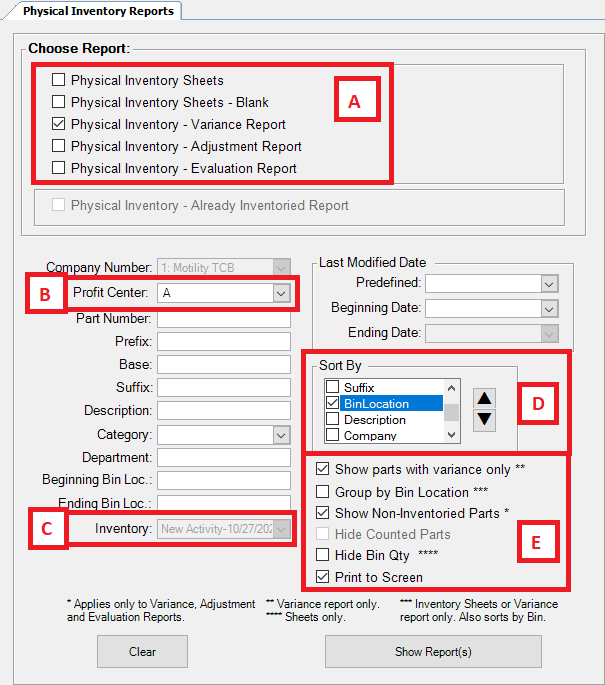
A. Choose the report. Physical Inventory Sheets will show the quantity of parts and a space to write in the counted quantity.
B. Set the Profit Center that you are counting.
C. Choose the Inventory that you created.
D. You can select how you wish your parts to be sorted in this box. I selected bin location, so that the parts in one bin can be easily counted before moving to the next.
E. You can choose from these options.
- RECOMMENDED: Choosing to Hide the Bin Quantity will remove the quantity that the program thinks are in individual bins from the sheets. This prevents the people counting from simply accepting the quantities as accurate.
- Choosing to Group by Bin Location will print each bin on a separate page, rather than just sorting in order (like in step D above).
Enter Count Quantity
- Open the Parts & Service module.
- Select the Tools menu in the upper left of the screen.
- Hover over Parts Tools, then select Physical Inventory. This will open the physical inventory main screen.
- Double-click over the row containing the inventory you started in step 7. This opens a screen that shows the list of all parts in the software.
- Click on the name of the column that matches how you sorted the inventory sheets in step 8D. In this example, we will sort by bin number. This ensures that the list shown on this screen matches the printed list to help speed up entry.
- Enter the quantities on hand into the Count Qty column. As you enter in your count, the text color will change from red to black.
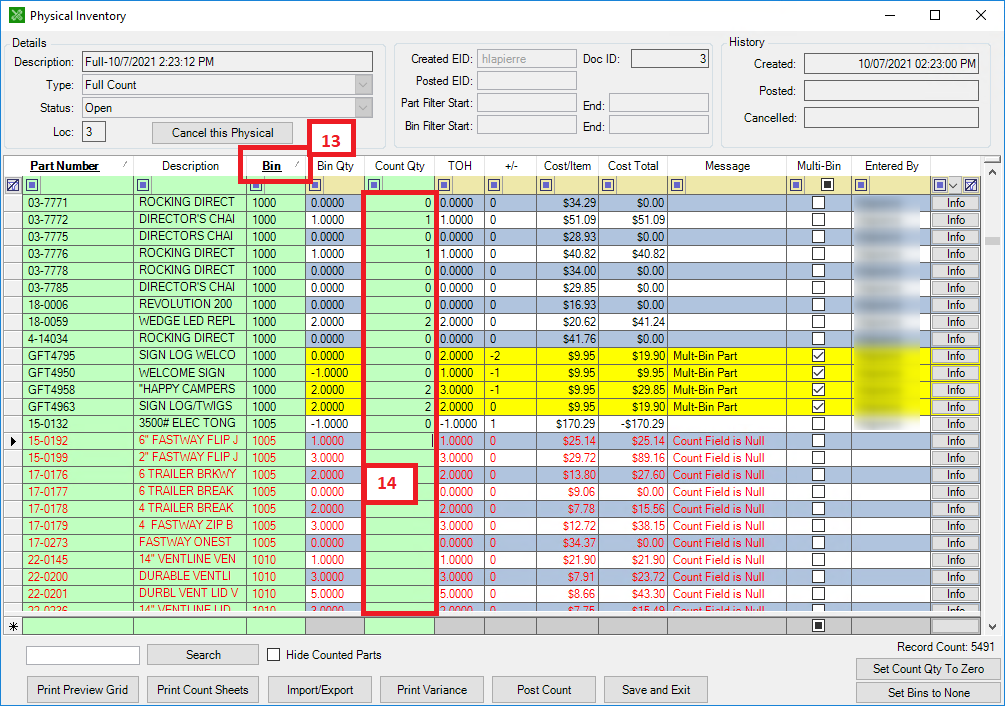
Optionally, you can update the bin location of parts by selecting the Bin and selecting from the drop down.
Note- If any parts are listed in red on the list, you will need to address the error displayed. All errors must be resolved before the final counts can be posted.
If you can’t finish your entries in one sitting, simply click the Save and Exit button. This will save what you have entered and exit out of the count. When you open the physical again, the values will still be saved and you can continue the input.
Run Variance Report
- If you’re still in the screen where we stopped in the steps above, you can click the Print Variance button at the bottom of the screen.
If you have left the inventory list screen, you can open the Reporting module, choose the parts reports, then select the Physical Inventory reports, then choose the Physical Inventory Sheets.
- Choose the report. The Physical Inventory – Variance Report will show the quantity of parts and a space to write in the counted quantity.
- Set the Profit Center that you are counting.
- Choose the Inventory that you created.
- You can select how you wish your parts to be sorted in this box. I selected bin location, so that the parts in one bin can be easily counted before moving to the next.
- Choose these options:
- Show parts with variance only.
- Show Non-Inventoried Parts.

This will return a report with a list of parts where the number physically counted does not match what the software contains. This may include parts with differing quantities or parts that were not counted at all.

Fix Any Issues
- Verify that each part on the variance report has been counted.
Set Count to 0
- Return to the physical count screen.
- Click the Set Count Qty to Zero button in the lower right of the window. This will open a popup window to confirm.
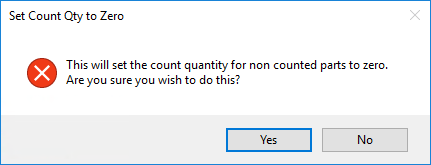
- Click the Yes button on the confirmation popup to set the count quantity to 0 for all uncounted parts.
Set Bins to None
- Click the Set Bins to None button in the lower right of the window. If a part does not have a bin assigned to it and you haven't assigned a bin during the count, clicking this button will assign the bin “None” to it.
Post Count
- To push the part counts to the Master Inventory, click the Post Count button.
IMPORTANT: Once you post the count, it cannot be unposted.
Run New Physical for Items Sold During Count
Because doing a complete physical count of your parts may take several days, there is a good possibility that parts have been sold during the time that the physical count was in process. Follow these next steps to ensure that the count is as accurate as possible.
Count Sold Parts
- Open the Parts & Service module.
- Select the Tools menu in the upper left of the screen.
- Hover over Parts Tools, then select Physical Inventory. This will open the physical inventory main screen.
- To start a new physical inventory count, click on the Start New Physical button in the bottom left of the window. This opens the new physical count options screen.
- Choose the option for Parts Sold During Count.
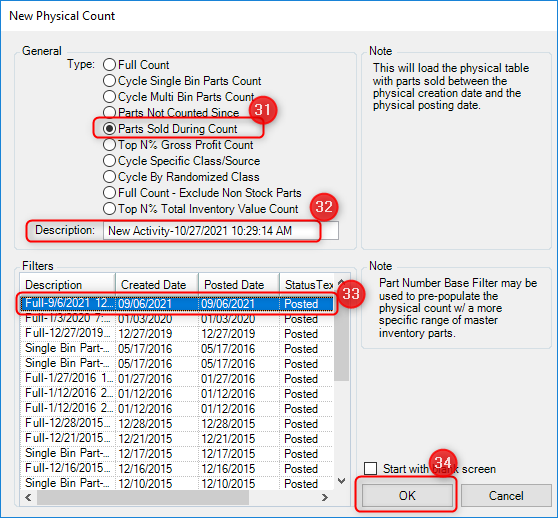
- If desired, you may update the description of the inventory count. By default, it will fill in the date and time that the inventory count was started.
- Ensure that the most recently completed full count is selected.
- Click OK. This opens a screen that shows a list of all parts in the software that were sold during the full count timeframe.
Print Count Sheets
- If you’re still in the screen where we stopped in the steps above, you can click the Print Count Sheets button in the lower left of the screen.
If you have left the inventory list screen, you can open the Reporting module, choose the parts reports, then select the Physical Inventory reports, then choose the Physical Inventory Sheets.
- Choose the report. Physical Inventory Sheets will show the quantity of parts and a space to write in the counted quantity.
- Set the Profit Center that you are counting.
- Choose the Inventory that you created.
- You can select how you wish your parts to be sorted in this box. I selected bin location, so that the parts in one bin can be easily counted before moving to the next.
- You can choose from these options if you want.
- Choosing to Group by Bin Location will print each bin on a separate page, rather than just sorting in order (like in step D above).
- Choosing to Hide the Bin Quantity will remove the quantity that the program thinks is in individual bins from the sheets.
Enter Sold Count Quantity
- Open the Parts & Service module.
- Select the Tools menu in the upper left of the screen.
- Hover over Parts Tools, then select Physical Inventory. This will open the physical inventory main screen.
- Double-click over the row containing the inventory you started in step 27. This opens a screen that shows the list of all parts in the software that were sold during the full count.
- Click on the name of the column that matches how you sorted the inventory sheets in step 29D. In this example, we will sort by bin number. This ensures that the list shown on this screen matches the printed list to help speed up entry.
- Enter the quantities on hand into the Count Qty column. As you enter in your count, the text color will change from red to black.
Optionally, you can update the bin location of parts by selecting the Bin and selecting from the drop down.
Note- If any parts are listed in red on the list, you will need to address the error displayed. All errors must be resolved before the final counts can be posted.
If you can’t finish your entries in one sitting, simply click the Save and Exit button. This will save what you have entered and exit out of the count. When you open the physical again, the values will still be saved and you can continue the input.
Run Variance Report
- If you’re still in the screen where we stopped in the steps above, you can click the Print Variance button at the bottom of the screen.
If you have left the inventory list screen, you can open the Reporting module, choose the parts reports, then select the Physical Inventory reports, then choose the Physical Inventory Sheets.
A. Choose the report. The Physical Inventory – Variance Report will show the quantity of parts and a space to write in the counted quantity.
B. Set the Profit Center that you are counting.
C. Choose the Inventory that you created.
D. You can select how you wish your parts to be sorted in this box. I selected bin location, so that the parts in one bin can be easily counted before moving to the next.
E. Choose these options:
- Show parts with variance only.
- Show Non-Inventoried Parts.
This will return a report with a list of parts where the number physically counted does not match what the software contains. This may include parts with differing quantities or parts that were not counted at all.
Fix Any Issues
- Verify that each part on the variance report has been counted.
Set Count to 0
- Return to the physical count screen.
- Click the Set Count Qty to Zero button in the lower right of the window. This will open a popup window to confirm.
- Click the Yes button on the confirmation popup to set the count quantity to 0 for all uncounted parts.
Set Bins to None
- Click the Set Bins to None button in the lower right of the window. If a part does not have a bin assigned to it and you haven't assigned a bin during the count, clicking this button will assign the bin “None” to it.
Post Count
- To push the part counts to the Master Inventory, click the Post Count button.
IMPORTANT: Once you post the count, it cannot be unposted.
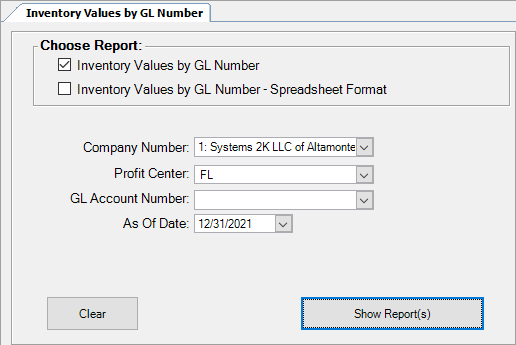
Run the Inventory Values by GL Number Report
- Open the Reporting module.
- From the menu to the left, expand the Accounting reports.
- From the menu to the left, expand the GL reports.
- Select the Inventory Values by GL Number report.
- Make sure you run the Inventory Values by GL Number report in accounting and that you verify your parts inventory balance closely matches your accounting balance.
Important Note: This report is time sensitive and recalculates daily.
Adjust GL Balance to Match Inventory Value, if there is a difference.
If the variance is greater than zero, you will need to adjust the GL balance to match the inventory value.
- Open the Accounting module.
Note: The posting journals automatically default to your first company and the Current Month set in your company information. If you wish to post to a different company or month, you will need to select the appropriate Company and/or Posting Month.
- Choose the Z1 – General Journal option from the list on the left side of the screen.
- Click the Add button in the lower left of the window. This will open a new, blank screen where you can add a new transaction.
- Enter a reference number for the adjustment transaction.
- Verify the posting month and year.
- Verify the transaction date.
- Click within the blank, starred gray line to add the parts inventory GL account.
- Enter the parts inventory adjustment:
- If you need to lower the parts inventory amount, enter the amount to be adjusted into the credit field.
- If you need to raise the parts inventory amount, enter the amount to be adjusted into the debit field.
- Click within the blank, starred gray line to add the balancing transaction: (This selection may vary depending on where you want the amount to show in your company’s P&L report.)
- If you need to lower the parts inventory amount, enter the offset amount into the debit field for the parts inventory adjustment account. This account can be either an expense or cost of goods account depending on your GL setup.
- If you need to raise the parts inventory amount, enter the offset amount into the credit field for the parts inventory adjustment account. This account can be either an expense or cost of goods account depending on your GL setup.
- Click the Save button to save the entries. This will open a confirmation window.
- Choose Yes to post the adjustment.
Optional Steps
Follow the Obsolete Parts Process