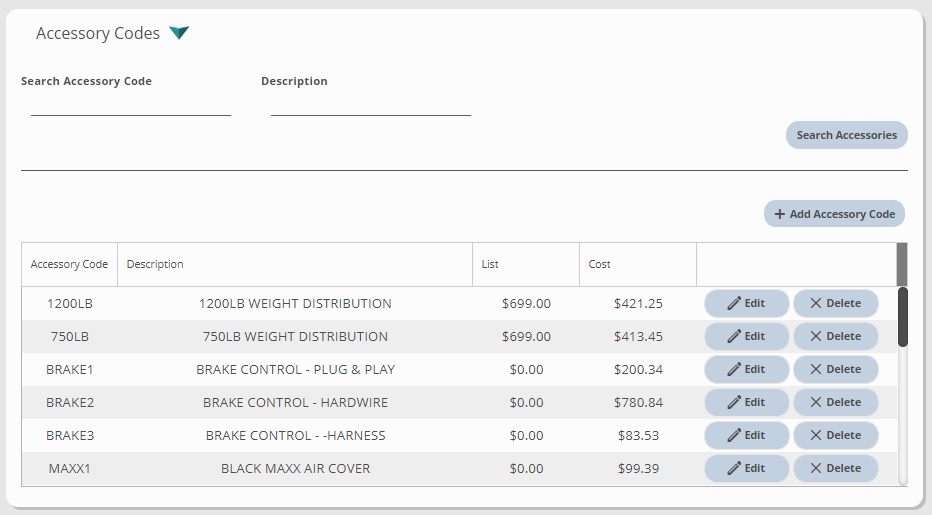
Accessory Codes are added to this list to be able to select when entering a unit to order or to easily add accessories to units on a deal. You can specify which accessories apply to specific unit makes, models, years, types and more.
Open Accessory Codes List
- From any module in MotilityAnywhere, select the user icon in the upper right of the screen to open the menu.
- Choose the Settings option from the menu. This will open a screen where, depending on your security permissions, you may view or update company settings.
- Select the App Settings tab.
- Click the Unit Inventory subtab on the left side of the screen.
- Click once over the Accessory Codes section. This will expand the section.

- Optionally, you may enter an accessory code to search for a specific accessory. If this is entered, you do not need to enter anything into the description field. To return all results, leave both of these fields blank.
- Optionally, you may enter some or all of the accessory description to search for a specific accessory. If this is entered, you do not need to enter anything into the accessory code field. To return all results, leave both of these fields blank.
- Click the Search Accessories button. This will open a list of accessories that meet your criteria below.

- If you need to edit an accessory code, click the Edit button on that accessory code row.
Add an Accessory Code
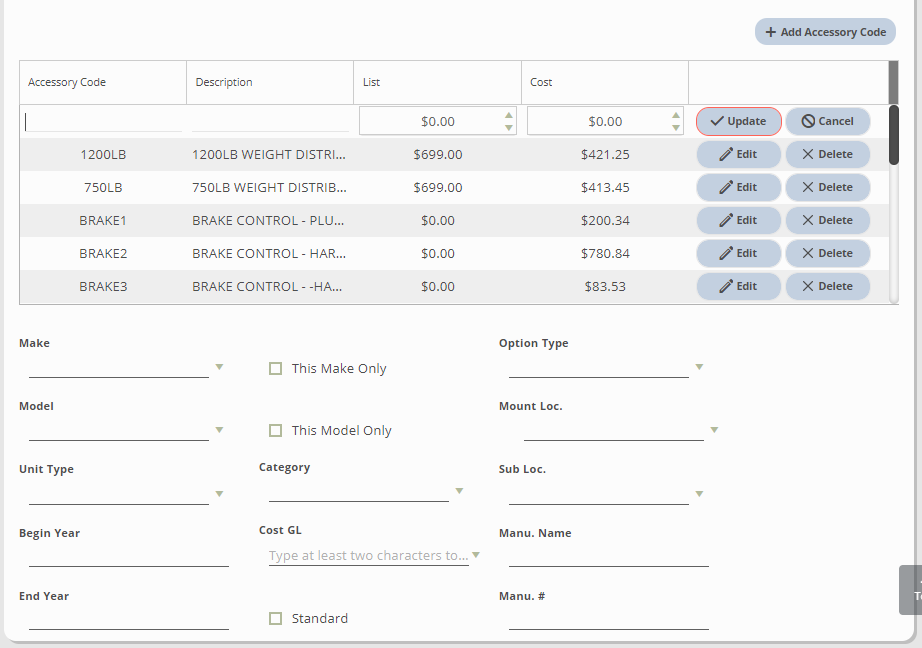
- Select the Add Accessory Code button in the upper right of the table. This will add a new, blank line and expand the accessory options below.
- Enter an abbreviation or code for the accessory into the code field. There may be duplicate options for a single code. Having a code allows for faster entry when adding the accessory to units or deals.
- Add the name of the new accessory in the description field.
- Enter the retail price for the accessory into the list field.
- Enter the accessory cost into the cost field.

- Optionally, you can specify a specific make for this accessory by choosing it in the make dropdown.
- Optionally, you can specify a specific model for this accessory by choosing it in the model dropdown.
- Optionally, you can choose a specific unit type for the accessory by choosing it in the unit type dropdown.
- If you want to choose vehicle years for the accessory, enter the range of years into the begin year and end year fields.
- Checking the This Make Only or This Model Only boxes will limit this accessory to only show when the make and/or model matches exactly what is selected for this accessory.
- Optionally, you can choose a category for the accessory using the dropdown selection box. Categories are entered into the Unit Details Pick List, then can be selected here.
- If you wish to have the accessory's cost impact a specific GL account, click the ellipsis button in this column. You can then search for and select the GL account.
- To have this accessory show in the list of standard accessories for matching units, check the Standard box.
- You can choose an option type for the accessory using the dropdown selection box. Option types are entered into the Unit Details Pick List, then can be selected here.
- You can choose a mount location for the accessory using the dropdown selection box. Mount locations are entered into the Unit Details Pick List, then can be selected here.
- You can choose a mount sub location for the accessory using the dropdown selection box. Mount sublocations are entered into the Unit Details Pick List, then can be selected here.
- If the accessory is from a specific manufacturer, you may type the manufacturer name and/or manufacturer number into the applicable fields.
- Click the update button for the record that you created. This button shows on the same line in the table as the new option.