Infinity has a built-in check writer that allows dealers to create and print checks and auto-draft transactions. The check writing system automatically tracks accounts payable, floorplan, and floorplan interest balances. You can also track accounts receivable credits such as customer deposits and refunds through the check writer. Quickly check your bank balance directly from the check writing screen, eliminating the need to run a report.
There is also a built-in auto check writer that allows you to write checks in groups or batches, print remittance reports, and invoice due reports. The check writer can also be configured to require approval before printing checks. This provides an extra level of security for the organization.
| Check numbers are automatically assigned based on the bank entity which you select to write checks. The check number can be found when opening the bank's entity profile. |
Pay an Entity Without an Outstanding AP / Accounts Payable Balance
Pay an Entity With an Outstanding AP / Accounts Payable Balance
Pay Toward a Floorplan or Floorplan Interest
Write a Check
- Open the Accounting module.
- Select the (00) Write Check/Drafts option from your menu tree on the left-hand side of the screen. This will open a popup window.
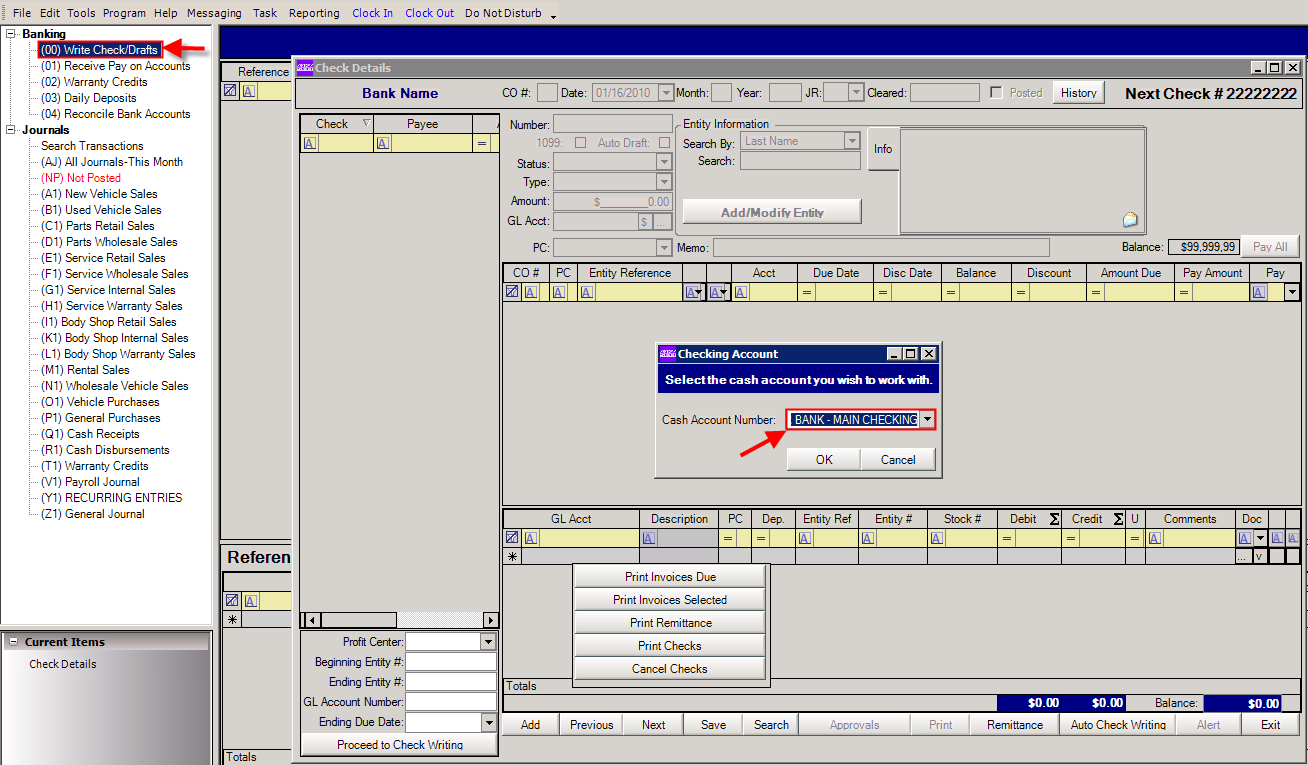
- Select the checking account you want to use to pay the checks you are going to write.
- Click OK. This will close the popup window and update the screen.
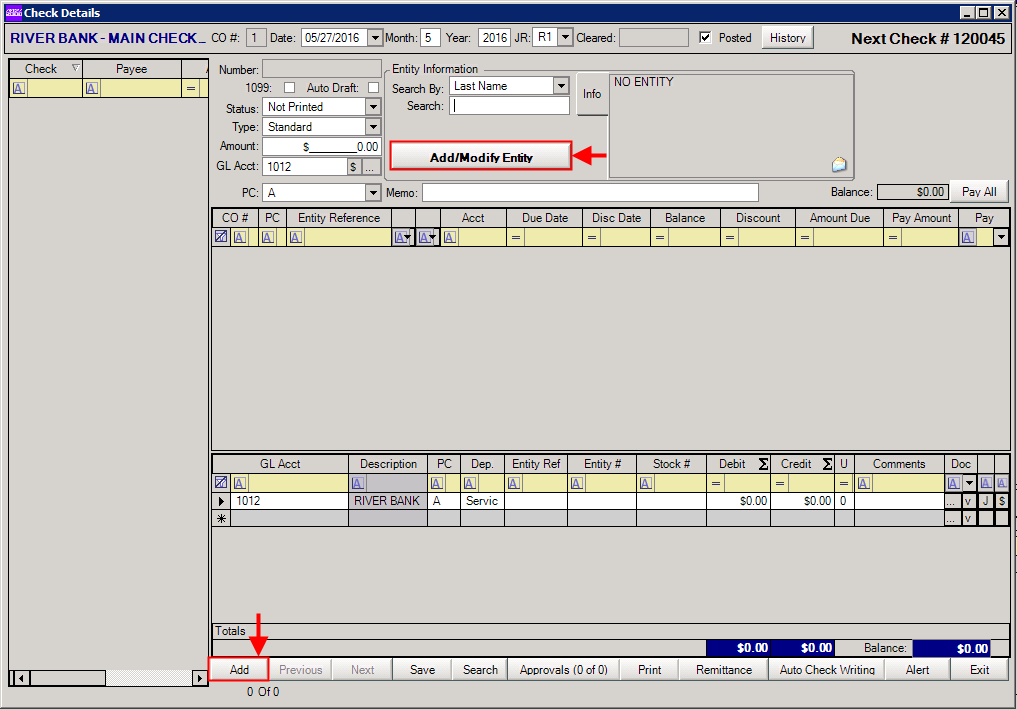
- Click the Add button in the lower left of the window to begin a new check.
- Use the search field to find an entity from your CRM database. Make sure the Search By field is set to use the correct criteria; otherwise the entity you are searching for may not be displayed in the search results. Once you’ve selected an entity their information will be displayed in the Info box.
Depending upon the entity selected, the steps going forward will change according to which type of check you’re writing.
Pay an Entity Without an Outstanding AP / Accounts Payable Balance
If you are writing a check directly to a customer, supplier, or employee that doesn‘t have an outstanding payable balance:
- Use the bottom general ledger to complete the transaction.
Note: The Entity # field should contain the entity # of the customer/supplier/employee selected and the Entity Ref. should contain a reference number that will be assigned to the transaction. This ensures that the check can be found on the entity’s AP/AR Info pages in the CRM for later reference.
- Once the transaction has been balanced and all of the corresponding check information is correct (PC, GL account, check type), save the check.
- Select the print button in the lower right when finished (if creating an actual physical check). This will update the status to Printed and the next available check # will be assigned. Otherwise, you can change the status to update the status without printing a check.
Pay an Entity With an Outstanding AP / Accounts Payable Balance
When an entity with outstanding AP balances is chosen, each invoice will be listed using a unique reference number, with the amount owed in the column to the right.
- You can either pay the full amount by clicking the Pay button on the far right or you may type in a specified amount to be paid in the Pay Amount field to the upper right. A discount may also be applied here using the Discount field. Once you fill in the Pay Amount or click the pay button, a transaction line will be created on the bottom to the debiting the AP account selected and crediting your checking account. This will then clear the payable from the entity once the check is saved and printed.
You can use the ellipsis button next to the transaction line to view documents attached to the payable (receiving ticket, GPO, finance deal), the “V” button to view the source document of the payable, the “J” button for specific job information and the “$” for relevant tax information.
You may pay more than one invoice with one check by clicking the Pay All button or by individually clicking Pay on each invoice you want paid this check; just make sure to use the Memo field to identify what invoices the payment is for. You may then print the check when you are finished and continue with a different entity’s payables to be cleared.
- Select the print button in the lower right when finished (if creating an actual physical check). This will update the status to Printed and the next available check # will be assigned. Otherwise, you can change the status to update the status without printing a check.
Pay a Customer Refund
After selecting the customer as the entity:
- Change the check type to select Customer Refund.
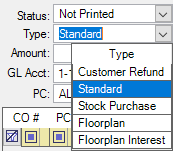
If the customer has an outstanding balance, they will show the same way that an entity with an outstanding AP balance is shown. You can follow the same steps to refund the customer.
Pay Toward a Floorplan or Floorplan Interest
Once you've entered the floorplan company as the entity:
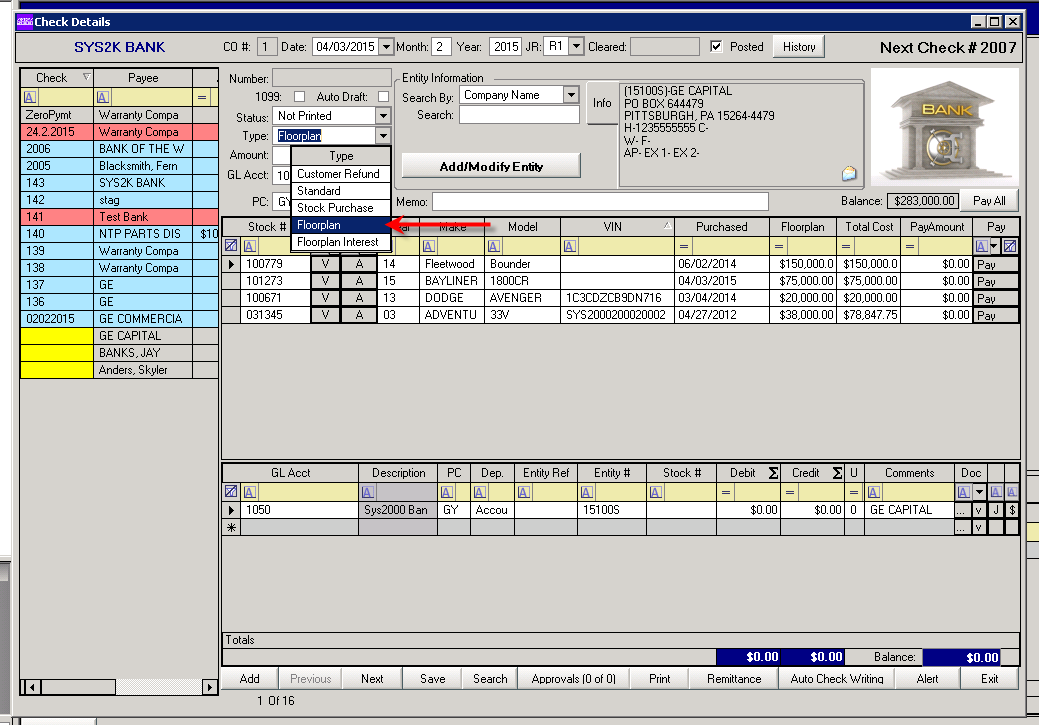
- Change the check type to Floorplan Interest. This brings up a list of units with a FP balance.
- Type the amount of the interest payment in the Pay Amount column of the correct unit(s). This will create the appropriate accounting transactions below.
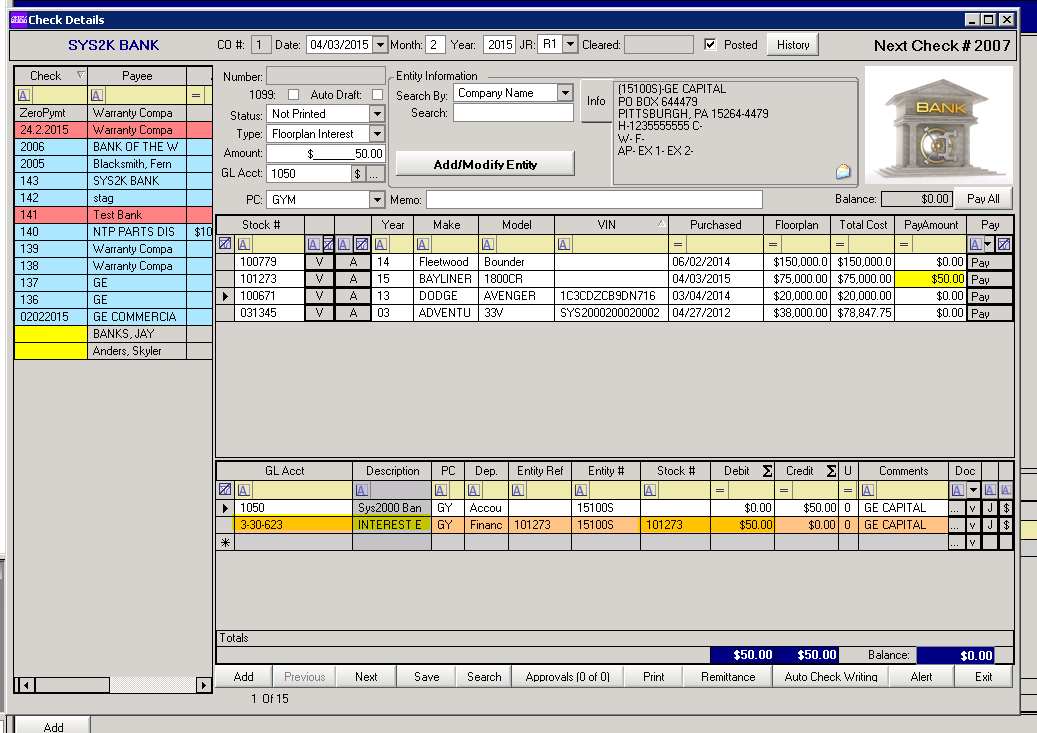
Curtailments are quite the same, except the check type is Floorplan.
Use a Custom Check Number
| Check numbers are automatically assigned based on the bank entity which you select to write checks. The check number can be found when opening the bank's entity profile. |
If you want to use a custom check number for just one check, check the “Auto Draft” box, then click anywhere on the Check Details page. This will update the “Number” field and make it editable, allowing you to manually enter a check number. Once you have entered the number, you may proceed as normal.
Void Check
If you need to void a check, locate the check to open it on the right side of the window, then update the check status to Voided. Save the check, and it will display as voided.