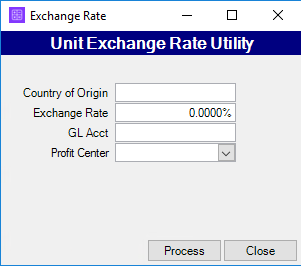
This feature is used by dealerships that purchase units internationally and want to apply an exchange rate to each unit they bought.
| Note: When entering vehicle information into your inventory there is a field named Country of Origin. You will need to fill in the field with the name of the country where the unit was purchased before using the Unit Exchange Rate utility. |
Enter an Exchange Rate
- Open the accounting module.
- Choose the Tools menu in the upper left of the screen.
- Select the Unit Inventory Exchange Rate option. This will open the unit exchange rate utility window.

- Enter the country where you purchased the unit into the Country of Origin field.
- Enter the Exchange Rate. For example, if you purchased a Unit for $10,000 and you have a 5% exchange rate entered, the system will create a transaction for that unit increasing the purchase price by 5% or $500.
- The credit amount will go to the GL Account you enter in the exchange rate screen.
- If this exchange rate will apply to a single Profit Center, you can select it from the dropdown. If the rate will apply to all locations, leave this selection blank.
- Select the Process button.
Adjust an Exchange Rate
Once you have entered an exchange rate, you can change the rate easily by using this utility.
Using the example 5% above as the starting exchange rate, entering a new rate of 7% will increase the units that have had the 5% applied by 2% to equal the new total.
If there are units that meet the criteria and did not have the original exchange rate applied, the program will apply the 7% exchange rate.