Letters are used to create email and print marketing material or email templates for the entire company and create automated marketing.
Add a Letter
- Open the CRM module.
- Choose the Letter Printing menu at the top of the screen.
- Select the option to Add/Modify Letters. This will open the Add/Modify Letters window and may take several moments to open.

- On the left side of the window, choose a Letter Type. This selection determines which specific merge fields that will be available to insert into your letter.
- Select the button in the lower left of the window to start a New Letter.
- The letter type will populate based on the category you had selected. You can choose a different type, if desired.
- Enter a name for the letter into the Letter Name field. This is internal only and will not be visible to customers.
- Click the button in the lower left to Edit Letter. You will receive a popup message asking if you wish to create an HTML file.
- Choose yes on the popup. This will open a new window where you can add your letter. If you will be building your marketing material from scratch in this window, please see the article on formatting your letter.
- Save the letter. This will return you to the Add/Modify Letters window.
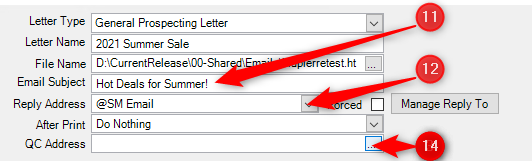
- Enter an email subject. This is visible to customers when they receive the email.
- Select a Reply Address. This is where customer responses to the marketing will go. If you need to edit the default employees, you can click the Manage Reply To button to add or edit the employees.
- In the After Print drop down, you can choose what you want to happen after the marketing is printed if this will be a print marketing.
- Enter a QC or quality control email address to preview what your email marketing material will look like before you send it to customers.

- On the right side of the window, you can mark the letter as active or not.
- Choose the company that this letter will be used for. To use this in all locations, select Company 0.
- Select the send method.
- If this will be an ongoing or recurring print marketing, you can limit how often this will be printed by entering a number of days into the Allow Reprint After Days field.
- To set an end on recurring marketing, choose an End Date.
- For recurring print marketing, you will click the Allow Schedule Print box.
Filter Customers
The central section of the Add/Modify Letters screen is a table where you can enter formulae to add restrictions or specify which customers you want to reach with the marketing.

- To make a formula, choose a ‘Field’ from the drop down. The available options include many fields from the customer's CRM profile.
- Choose an ‘Operator’.
|
This is looking for an exact match to the Value for the chosen Field. |
|
Choose this operator if you want to enter a range of options in the value field. |
|
This operator looks for the information entered in the value as the beginning of the field. |
|
This operator looks for the information entered in the value at the end of the field. |
|
The value information is anywhere within the field. |
- Enter the value. If you are entering a partial word, you can use the percentage sign (%) as a wildcard.
- For the And/Or column, as you add new lines to the filter, this will automatically populate with AND. You can edit this if desired by selecting another option from the dropdown.
- If you are adding multiple formulae, please make sure you open and close the brackets.
Filter Examples
Customers with an Email Address

- Select email address as the field.
- Choose the Contains operator.
- Enter the value "%@%" without quotes.
This will return only customers with an email address that includes the “@” symbol.
Customers in Specific States

- Select State as the field.
- Choose the In List operator.
- Enter the values separated by a comma.
This will return only the customers whose address state information contains one of the values in the list.
Begins With / Ends With / Contains
- Select the Last Name option for the Field.
- Enter "Smith" into the Value.
- Using the Begins With operator, your results will show Smith, Smithers, Smithson, etc.
- Using the Ends With operator, your results will show Smith, Goldsmith, Wildsmith, etc.
- Using the Contains operator, your results would show all of the examples listed above.
- Click on 'Show Results' to test the formula.
Export Results
- Choose the 'Show Results' button. This will show the results in spreadsheet format.

- Click on the ellipsis button. This will open up the ‘Save As’ screen.
- Navigate to where you want to save the file.
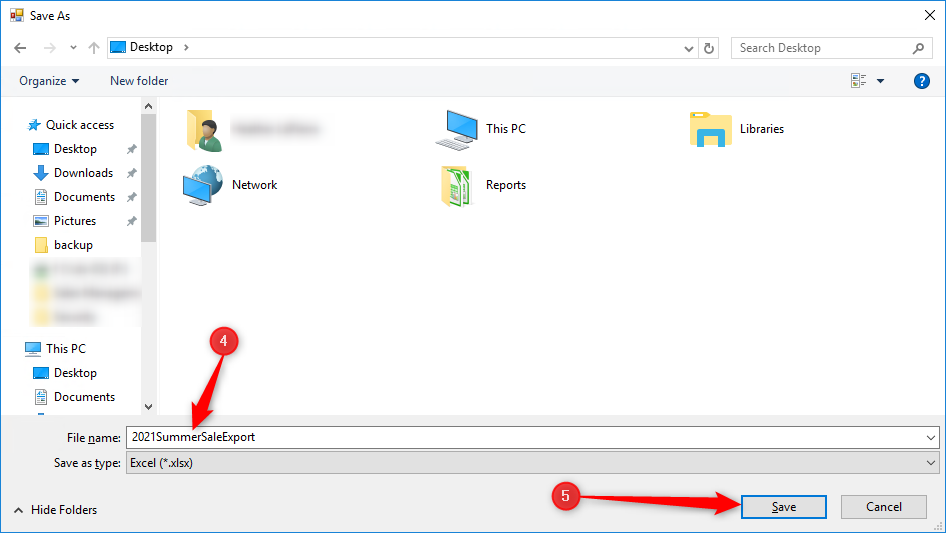
- Enter a name for the results list.
- Choose the Save button. The file will automatically save as an Excel (.xls) file unless you save it as another file type.
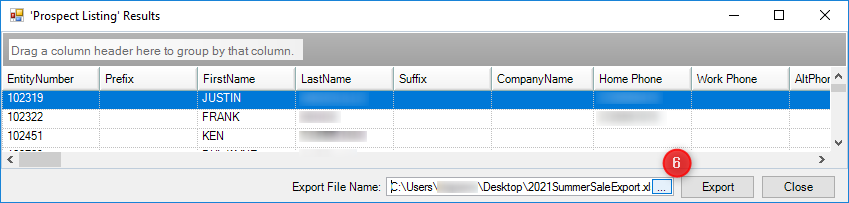
- The file path and file name will be populated in the ‘Export File Name’ field. Click the ‘Export’ button to save the file where you selected.