Add Specific Accessories for Year / Make/ Model
Send a Notification to the Service Department
Access Deal Accessories
- Open the Deal Desking module.
- Open the deal.
- Select the Acc. tab.

Add Accessories

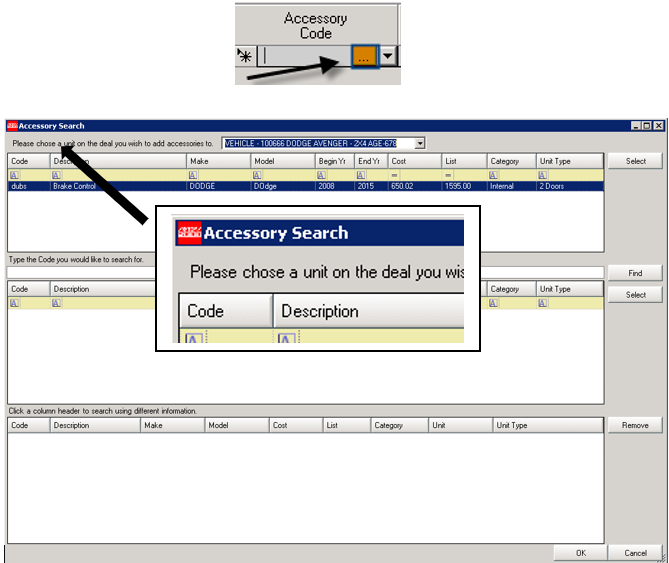
- Enter the desired Accessory Code into the blank, starred gray line to load the Description, Cost, and List price of the Accessory. Alternatively, you can click the ellipsis “…” button to search for accessories, which will open the Accessory Search window.

- Canned Jobs from the Service Module can be added to the unit by clicking the drop-down arrow under Accessory Code.

Add Specific Accessories for Year / Make / Model
- If you created accessories and applied specific makes and models to them, you can click this button to add all accessories for this specific unit make and/or model.

Add Parts
- Parts from Parts Inventory can be added to a deal by typing the part number, or by doing a Parts Search by clicking the ellipsis “…” button.

Note: The part needs to have the box Sell In Finance checked in Master Inventory or you will receive an alert.

Start Service RO for the Accessories and Parts Added
Important: Before you click Start Service RO button, make sure the Add To RO check box is selected for each item you want added to the unit and that the Unit column is populated with the Vehicle.
- Click the Start Service RO button.

A Service Invoice will be created, and the Invoice Number is displayed on the screen.

The Parts and Accessories will move down to show under the Pre-Installed Accessories section.

If you want to add the cost of the accessories to the cost of the unit, please refer to the Apply Internal Service Invoices to the Cost of a Unit article.
Send a Notification to the Service Department
- Click the Add Note button at the bottom of the deal. This will open the Quick Comment window.
- Enter your message for that department.
- Click OK to send.
