This article reviews the deal screen.
Deal Header
The header of a quote or deal contains information relevant to the deal and reflects information added to the deal.
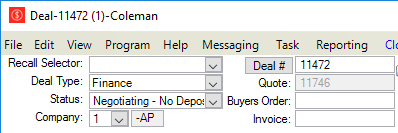
The recall selector can be used to open a different deal while you have a deal open. Click the arrow to open a list of the deals and quotes.
The deal type and status are used to easily see and reference the applicable selections. These normally show as columns when viewing the deal list, and the status determines the color of the deal in the list.
The company number is set to the location where the deal or quote was started, but can be changed by selecting a different location from the available options.
The deal number is automatically populated. If the screen you're viewing does not have a deal number, it is a quote. You can easily change quotes into deals by clicking the Deal # button.
The quote number is automatically populated.
If your dealership tracks buyer's order and invoice numbers, you may enter them into the appropriate fields.

The buyer, purchase unit, and trade unit information will display in the center of the deal header.
In the upper right, you can select the finance source for the deal. Finance sources have to be created before they can be selected here.
The delivery date is usually set to the date that the unit will be delivered to the customer, while the purchase date is the date that the dealership and customer agree to the purchase. The signing date should be the date that the customer signs the contract.
Deal Buttons

New
To begin a new deal without closing the current deal, click the new button in the lower left. This will open the Choose Preset screen so you can start a new deal.
Search
To search for an existing quote or deal, you can select the search button to enter criteria. If you know the deal or quote number, enter it into the entry fields to the right of the exit button.
Save
Click this button anytime during the deal creation to keep changes that you have made to the deal.
Post to Acct
This button is only shown if the deal has a closed status. Only completed deals can be posted to accounting.
Exit
Click the exit button to leave the deal screen and return to the quote or deal list.
Menu
If your dealership offers menu plans, you can view them by selecting this button. It will open a window to display the different plan options to customers.
Start Service RO
This button is used with the Accessories tab to move accessories to a service ticket.
Notes
To add a note, click the small arrow on the Notes button at the bottom right of the deal. Choose to add a note. Enter your note in the text window in the middle, and click OK. To view notes, simply click the Notes button.
Show Sales View
Click the sales view button to open a customer-friendly view of the deal.
Deal Profile Tabs
These tabs can be hidden by changing permissions for your users. You may also designate a specific default tab to open when accessing a deal record.
Quote Tab
The quote tab contains retail and cost information about the deal. The quote tab also has several subtabs, which can allow aftermarket products, other fees, deposits and more to be added.
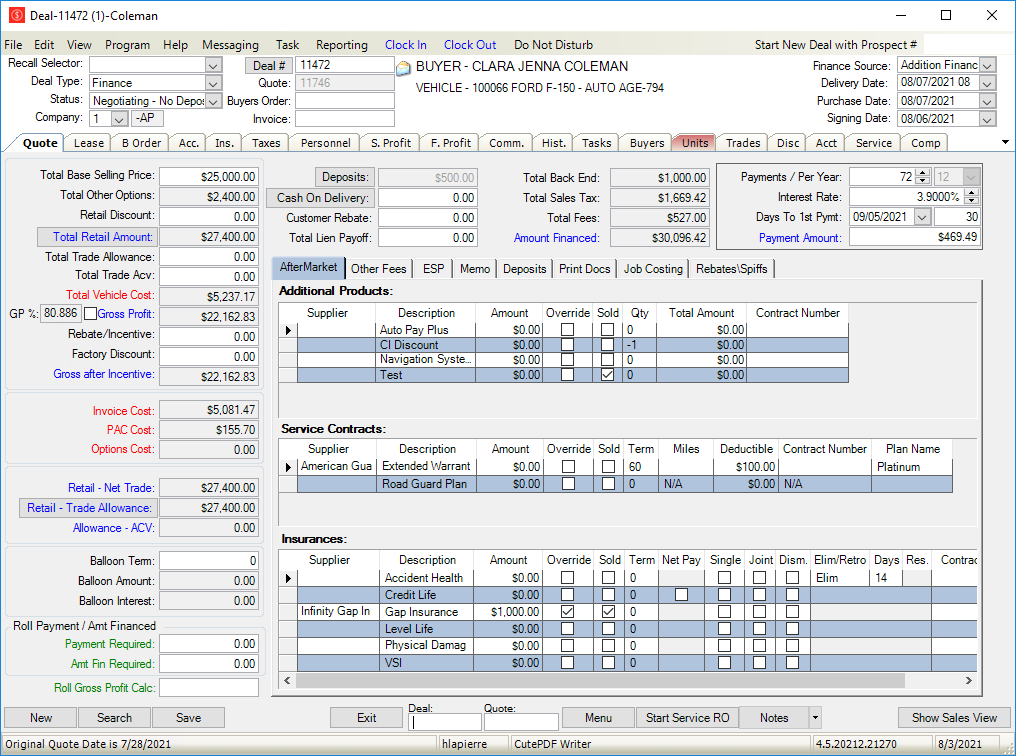
Pricing Info
Most of these fields calculate based on the information entered for the purchase unit and the unit trade. You can enter/modify the following fields in this section:
- Total Base Selling Price
- Retail Discount
- Trade Allowance – You can under or over-allow on the trade which affects profit
- Trade ACV (Actual Cash Value)
- Rebate Incentive
- Factory Discount
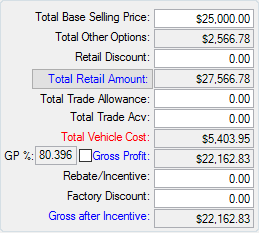
The following fields are populated from another part of the software or calculated as shown here:
- Total Other Options – Total of Accessories Tab
- Total Retail Amount – Base Selling Price minus Retail Discount
- Total Vehicle Cost – Cost of the units on the Units tab (Including Internal Work and Estimates)
- Gross Profit – Total Retail minus Total Vehicle Cost
- Gross after Incentive – Gross Profit minus Rebate/Incentive
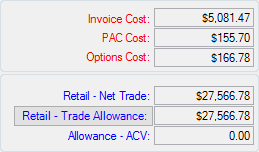
Cost Info / Trade Differences
These fields are not editable, because they are calculated.
Other Options
Other Options allows for balloon loans to be calculated.
Roll Payments
The Roll Payments options are calculated to the desired amount by changing the part of the deal you select.
- Roll Payment Required will adjust the deal until your desired payment is met
- Roll Amt Fin Required adjusts deal until the total amount Financed is met. This is also used on cash deals to calculate an out of the door selling price including taxes and fees.
- Roll Gross Profit Calc. allows the total Gross Profit to be adjusted.

This section allows you to enter Deposits, Cash on Delivery, Customer Rebates, and Total Lien Payoff Information. This corresponds to the Lien Payoff Information located on the Trades Tab.
Totals
Total Back End as shown on the F Profit Tab and Aftermarket Products section
- Total Sales Tax from the Taxes Tab
- Total Fees from the Other Fees section
- Total Amount Financed
Payment Calculator
By entering the total number of payments and the interest rate, you can see the estimated monthly payment.
Subtabs
There are several subtabs shown on the right side of the quote tab.
Aftermarket Subtab
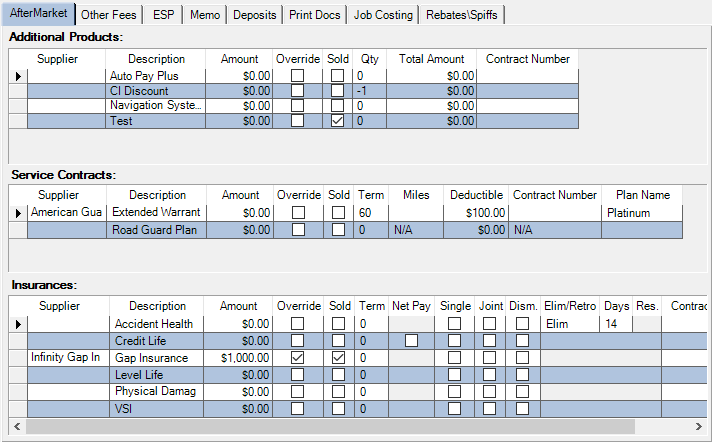
Has separate options for Insurance Products, Service Contracts, and Additional Products to be sold.
Other Fees
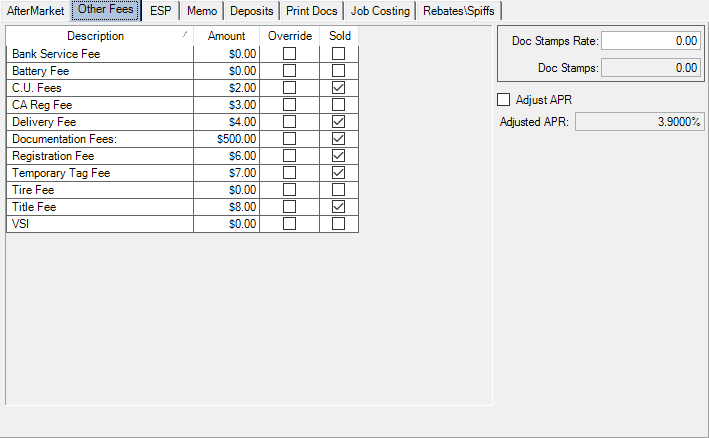
You can customize the fees on each deal. Fees can be checked as Sold and the Amount can be changed.
ESP
Equity Savings Program calculates the savings.

Memo
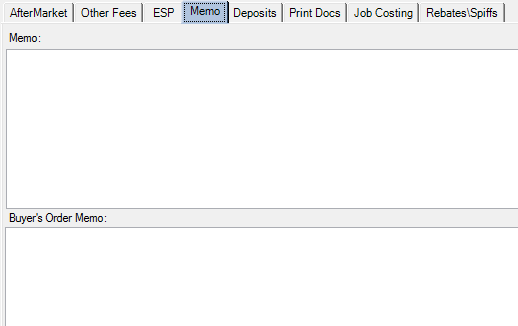
Memo Section contains notes that pertain to this deal. The buyers order memo notes section allows these notes to print on a customer form.
Deposits
The deposits tab is where you can add deposits and cash out deposits when the customer makes a payment.

Print Docs
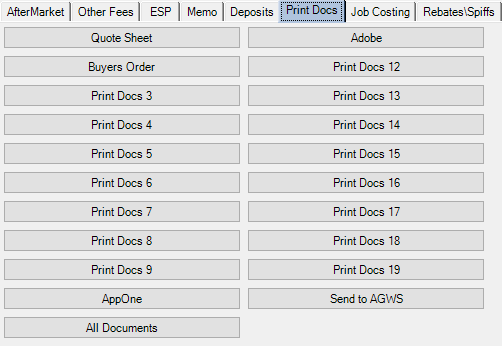
Select this tab to view shortcuts of dealership documents for the deal. Click over the button of documents that you want to print and they will print to your chosen printer. If your dealership is integrating with AppOne or American Guardian, you will have a button to allow you to send the deal to them.
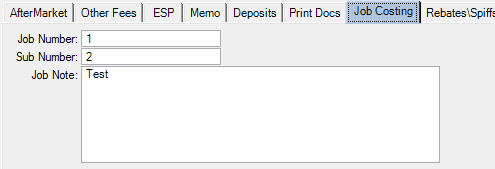
Job Costing
Add control numbers to this deal that can be used for reporting later. The Job number is added to the accounting transaction along with the Job Note and Sub Number.
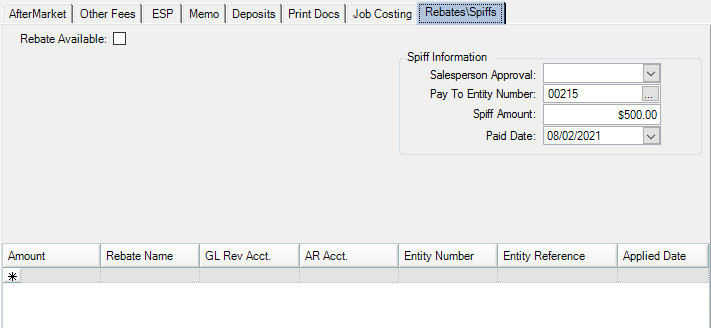
Rebate or Spiffs
Use this tab to add any rebates or spiffs that you want applied to the deal.
Buyers Tab
If you entered the buyer and co-buyer's information in the prospect's CRM profile and started a deal from there, this information will be filled in for you. If you chose to create a quote or deal without using the information from the prospect's profile, you can add the information here.
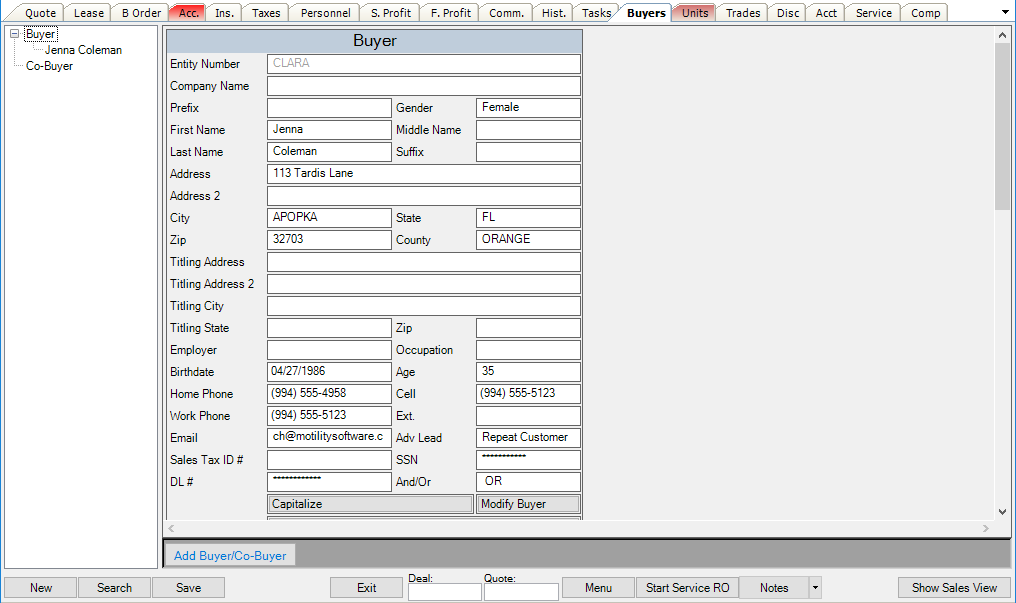
Select the Add Buyer / Co-Buyer button to the lower left if you need to add a new entity. You can click in the Entity Number field to search for an entity to add, then fill out all the fields and click Save.
Select the Capitalize button to automatically capitalize all of the buyer information in this tab. This helps keep your data entry consistent.
If you need to make changes to an existing buyer, choose the Modify Buyer button. This will open the entity record to allow changes.
If you need to remove a co-buyer, click at the top of the record to highlight it, then click the delete button on your keyboard.
When entering a co-buyer, you can use the Copy Buyer's Address button to quickly add the same information to the co-buyer.
Trades Tab
If you entered this information in the prospect's CRM profile and started a deal from there, this information will be filled in for you. If you chose to create a quote or deal without using the information from the prospect's profile, you can add the information here.
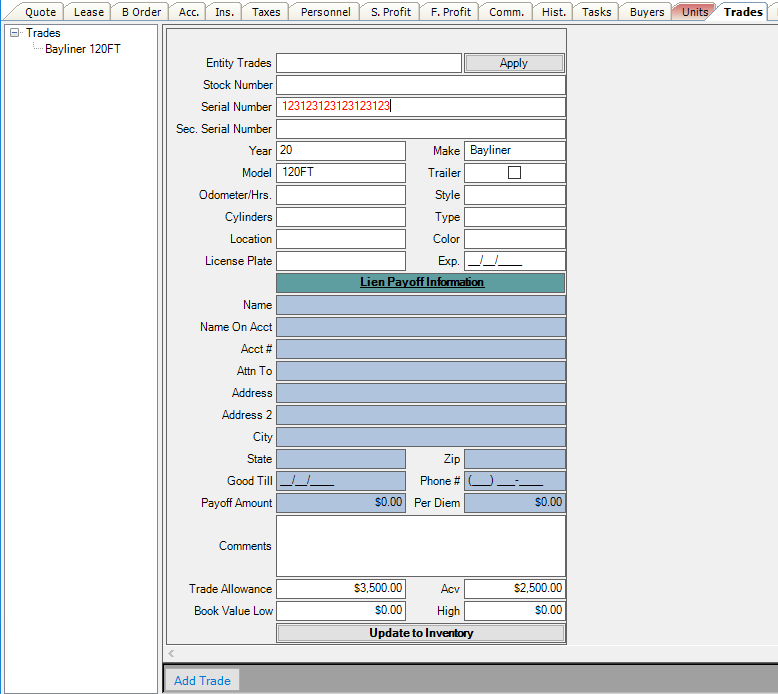
Add a Trade
- Click the drop down arrow next to the Entity Trades field to see a list of all trades from the Trades tab of the entity.
- Click the apply button to add the unit to the deal.
- If the Entity Trades are empty, fill out the Year, Make, Model, and Type.
- Lien Payoff Information must also be entered if applicable. The payoff amount will affect the gross profit of the deal.
- Enter the Actual Cash Value into the ACV field.
- Trade Allowance allows for an amount greater than or less than the actual cash value to be shown on the deal. The difference will affect the gross profit.
- Selecting the Update to Inventory button allows a stock number to be assigned to the trade immediately. Use this if internal work needs to be done before the deal will be washed out.
- Once a stock number has been assigned to the trade unit, the Modify Inventory button will link to Unit Inventory.
Units Tab
If you entered this information in the prospect's CRM profile and started a deal from there, this information will be filled in for you. If you chose to create a quote or deal without using the information from the prospect's profile, you can add the information here.
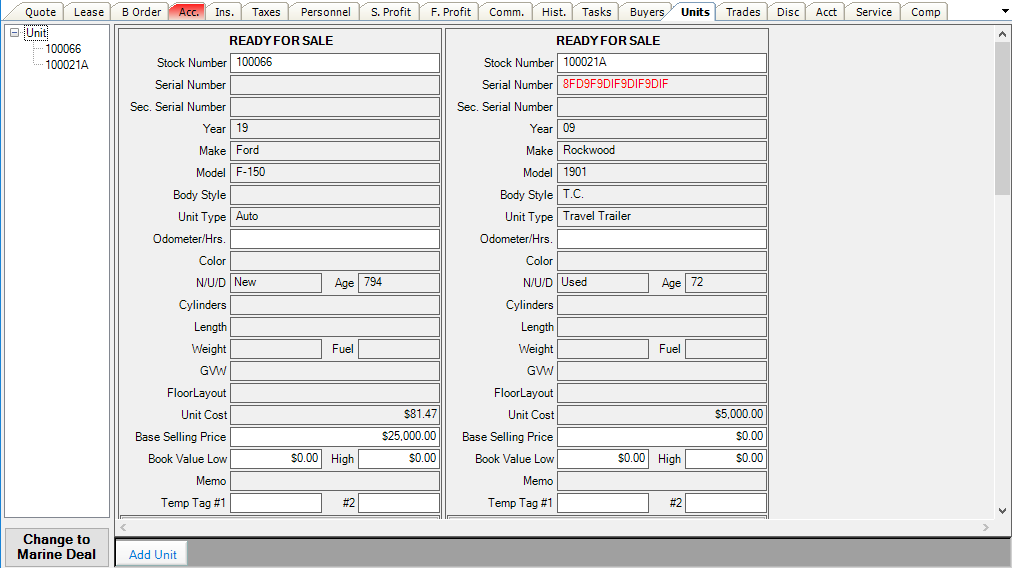
To add additional units to the deal, click the Add Unit button in the lower left. If you need to remove a unit, first add the correct unit, then click at the top of the incorrect record to highlight it, then click the delete button on your keyboard.
Accessories Tab
The accessories tab allows aftermarket products to be included on the quote. The price of accessories will populate the Total Other Options box on the quote tab.
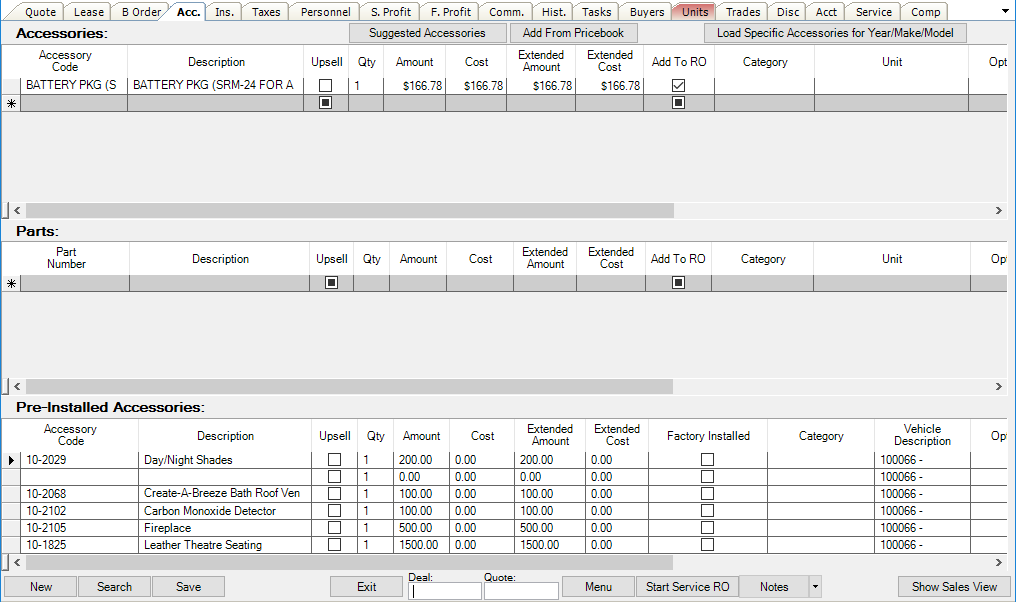
Please refer to the Add Accessories article for more information about adding accessories.
Start Service RO
This button is used in conjunction with the accessories tab. After parts or accessories have been added in the Acc. tab, selecting this button will move them to a service repair order (RO) for the service department to install.
Taxes Tab
The taxes tab contains the location titling rates and additional customization options for taxes on the deal.
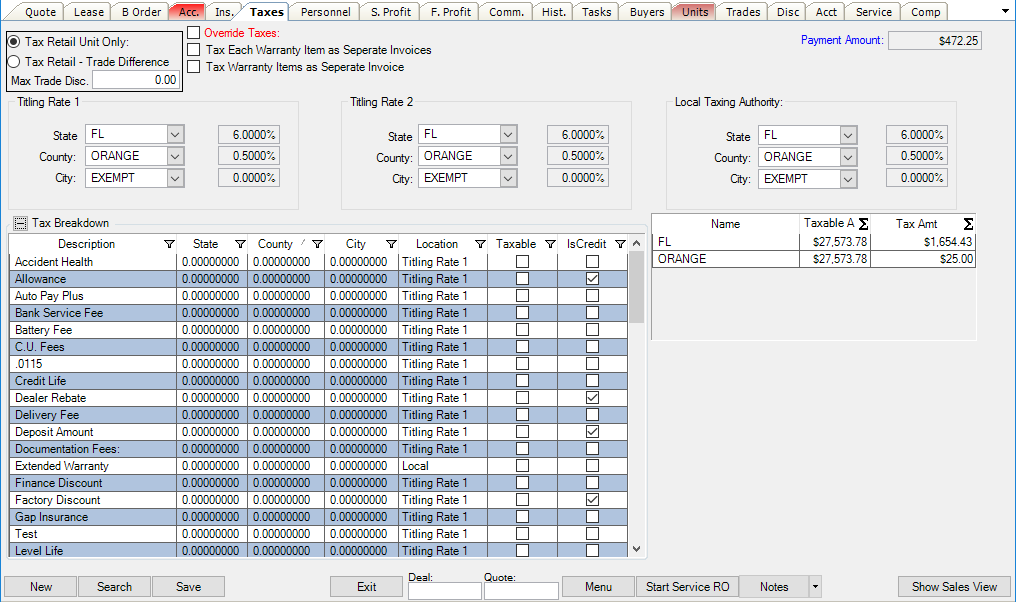
If you need to tax the retail unit only, in the upper left of the tab, select the Tax Retail Unit Only option. By default, taxes are set to calculate based on the retail amount of the unit minus the trade allowance. This is indicated with the Tax Retail – Trade Difference option in the top section.
When you want to set a maximum amount to use as the trade difference to be taxable, enter in that amount in the Max Trade Difference field. For example, if the maximum amount you want taxable on a trade is $1500, and the retail amount on the unit is $30,000.
If you need to override the taxes on a deal, click the Override Taxes box. This will change the view of the taxes layout for you to enter in the amounts you want the taxes to be. Please bear in mind that choosing this option may affect how your deals show on tax reports.
The tax breakdown section under the plus sign in the lower left allows every Fee, Warranty, Deposit, Unit, and Trade to be taxed at a different rate. The location here corresponds with the three Titling Rates above. If a particular fee is taxed at a different rate, you can set the location to Titling Rate 2.
Buyers Order Tab (B. Order)
The buyers order is the salesperson’s view of the deal. This allows salespeople to structure and desk their own quotes/deals without the ability to see vehicle cost and profit figures.
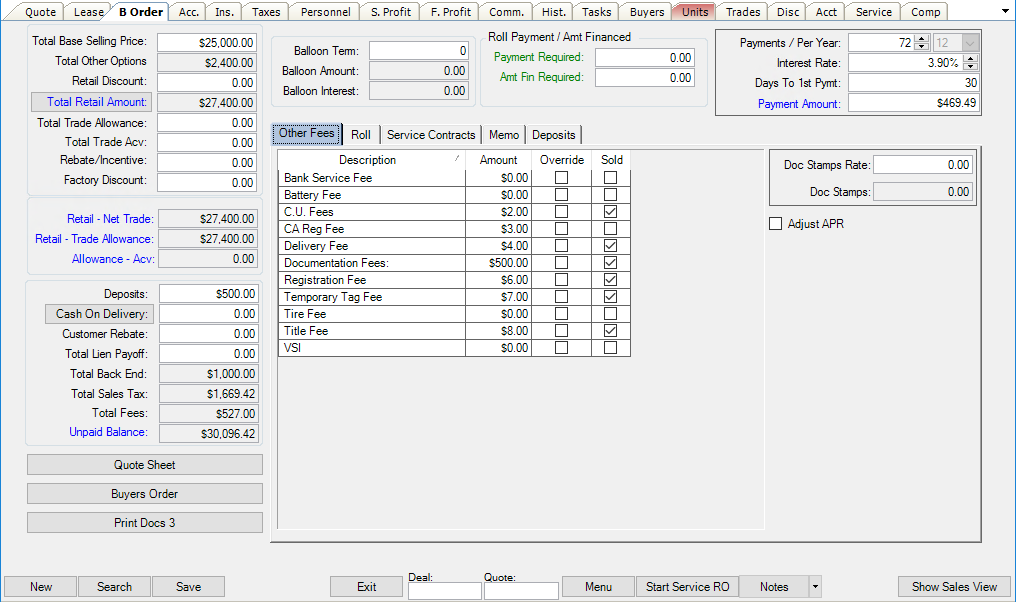
The fields shown here include the same fields as in the quote tab.
Comparisons Tab
This tab is used to compare different versions of the current deal. You can show the customer the comparisons tab as a selling tool. For example, you might use comparisons tab to compare the estimated monthly payment using different finance sources. You can show the customer how the deal might change with different Cash Down values, or compare the deal with or without a trade.

Type the information you wish to compare in each comparison section.
Use the Apply button to apply the deal type and payment information to the active deal.
Insurance Tab (Ins.)
The Insurance tab allows the customer’s vehicle insurance policy information to be entered. This is used for any government or bank forms that require the buyer’s insurance be printed.
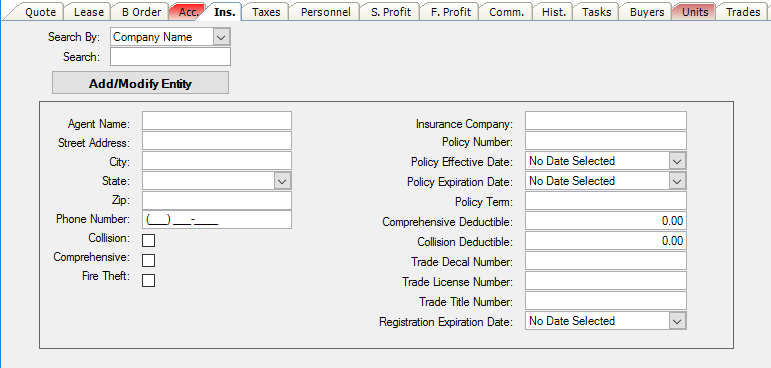
The search field is for the insurance agent entity. Type the search terms and click Add/Modify Entity to perform a search.
Disclosure Tab
The disclosure tab is a simple view-only collection of deal information.
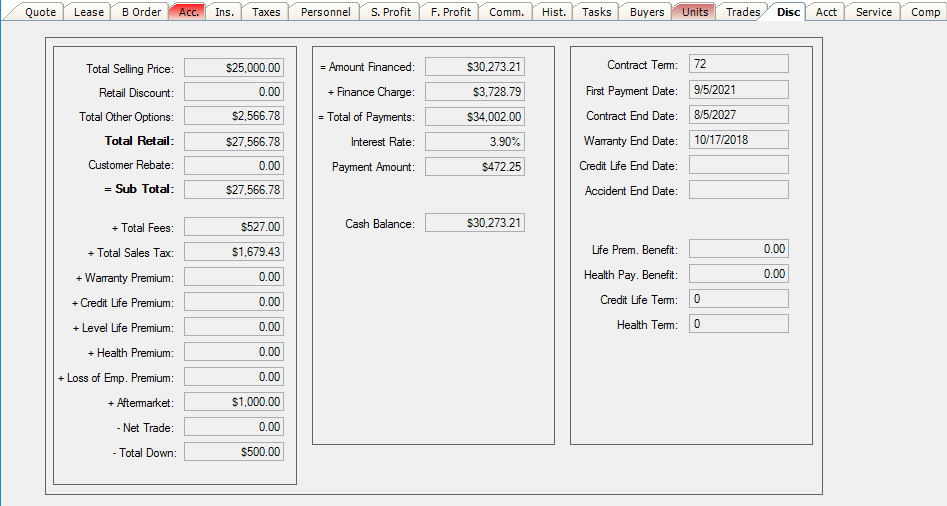
The top section shows all retail amounts, including discounts, Sales Tax, Premiums, Trade Allowance, and Down Payments. The next section shows Amount Financed, Finance Charge, Total of Payments, Interest Rate, Payment Amount, and Cash Balance. The final section shows Contract Term, First Payment Date, and the terms on aftermarket coverages including end dates.
Sales Profit Tab (S. Profit)
Sales profit shows front end profit information. It also allows commission adjustments to be made.
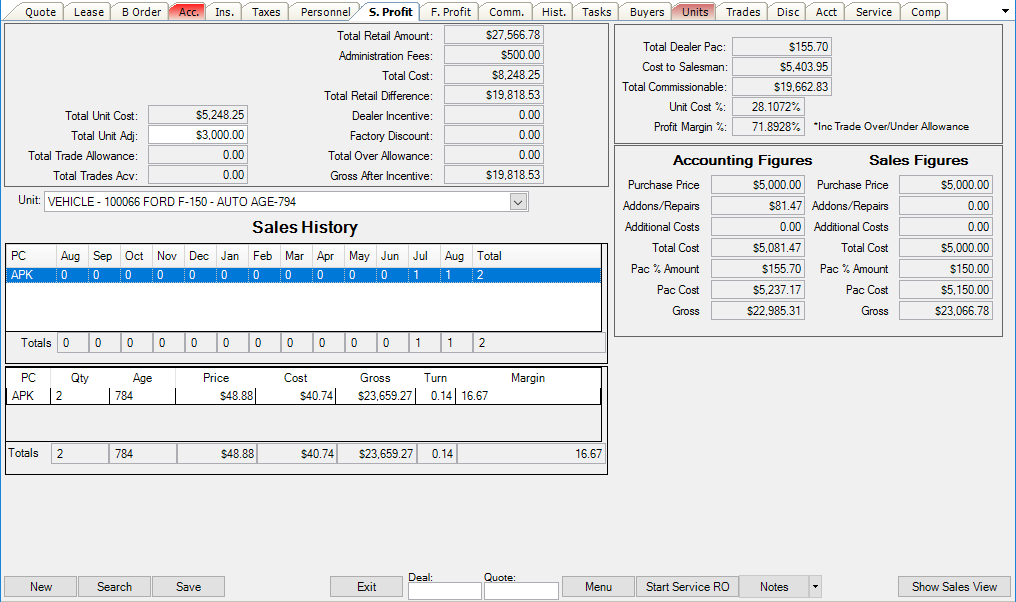
The Total Unit Cost shows the cost from accounting including any internal or prep work. Total Unit Adj. allows the sales manager to adjust the commissionable amount up or down using a positive or negative dollar amount. This changes the cost used on the commissions tab without affecting accounting. The other fields on the S Profit tab are view-only. At the bottom of the sales profit tab is the Sales History. This section shows the sales history for the Make and Model of the vehicle being sold. The turn ratio is also calculated.
F Profit Tab (F. Profit)
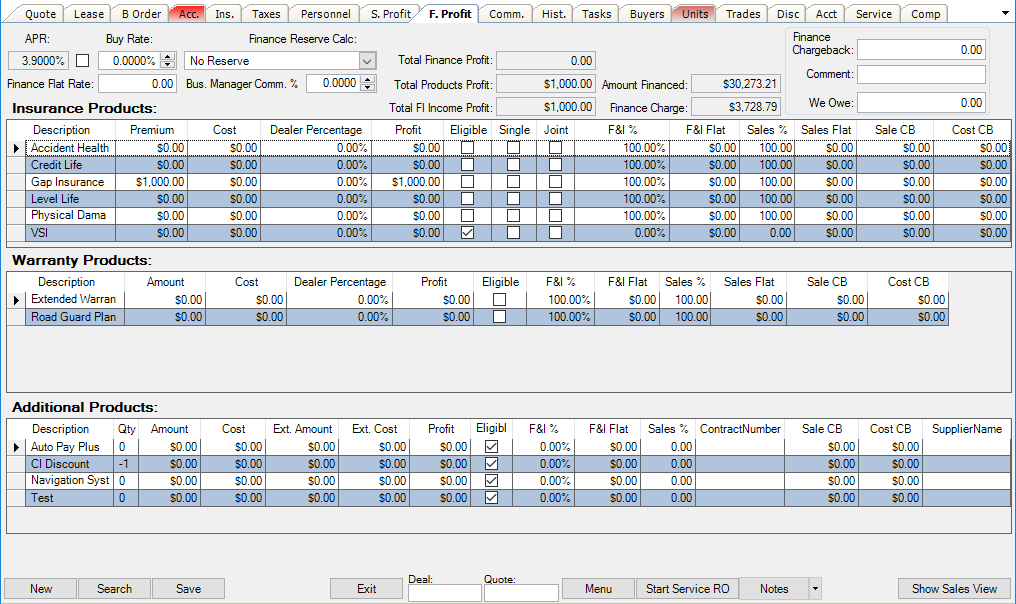
Finance Profit tab allows for the finance profit to be calculated. Here you can calculate Finance Reserve, which is the money the dealership receives for sourcing the loan. F Profit also shows aftermarket product cost. This is the money the dealership pays for the warranty and insurance products you sell. Finance Reserve creates an accounts receivable transaction to the bank, while product cost creates an accounts payable entry to the warranty or insurance company.
Finance Reserve
The APR is not editable here. It must be changed on the Quote Tab in the payment calculator. Finance Flat Rate allows the Reserve to be entered in as a flat rate.
Alternatively, you can enter the Buy Rate and Finance Reserve Calculation. There are 60+ reserve calculations to choose from. You can find which reserve calculation to use by contacting your finance bank(s). The Finance Flat Rate will be added to the Finance Reserve Calculation. You can see the total reserve in Total Finance Profit.
Entering information into the Finance Chargeback field allows for products to be charged back to the deal. Accounting transactions will be created for Finance Chargeback and We Owe.
Insurance Products Profit
The Premium for each product can be changed from this screen as well as on the Quote tab, but this is the only place to enter the Cost. You'll need to make sure the product is marked as sold on the Quote tab.
Entering the Dealer Percentage allows the cost to be calculated. You can also type the cost as a flat amount. When you type a cost, the profit is calculated.
Checking the Eligible box will be used to calculate product penetration. For example, if a customer is not eligible for an insurance product, it will not count against market penetration.
Single/Joint is an option for each insurance product.
Commissions can be split between the Front and Back end on the commissions tab by entering percentage amounts into the F&I % and Sales % columns. Commissions can also be entered as a Flat dollar amount.
Sale CB and Cost CB are for partial or complete charge backs. These numbers also affect profit.
Warranty Products Profit
The Amount is the premium of the warranty product, and the Cost creates the payable to the warranty company listed on the Quote tab. Make sure the product is marked as sold on the Quote tab for the profit to be calculated.
Dealer % allows the cost to be calculated based on the premium. Checking the Eligible box will be used to report on market penetration. For example, if the customer is not eligible for a warranty product, you can uncheck the box and this sale will not count against market penetration.
Commissions can be split between the front and back end on the commissions tab by entering percentage amounts into the F&I % and Sales % columns.
Sale CB and Cost CB allows for partial or full charge backs to affect profit (and commissions) on this deal.
Additional Products Profit
Additional products must be marked as “Sold” on the Quote Tab before profit will be calculated.
Amount is what the customer pays for the product and Cost is what the dealership pays the provider. The Eligible checkbox allows for the Product Market Penetration to be reported. For example, if a customer is not eligible for the aftermarket product, you can uncheck the box and this sale will not be considered a lost sale due to ineligibility.
Commissions can be split between the front and back end on the commissions tab by entering percentage amounts into the F&I % and Sales % columns.
Contract Number will be reported in Parts and Service when the customer brings the unit in for service.
Sale CB and Cost CB allows for partial or full charge backs to affect commissions on this deal.
Commissions Tab
This tab provides a breakdown of the employees associated with the deal and how they are earning money from the deal. Employees need to be added to the personnel tab to show in the commissions tab.
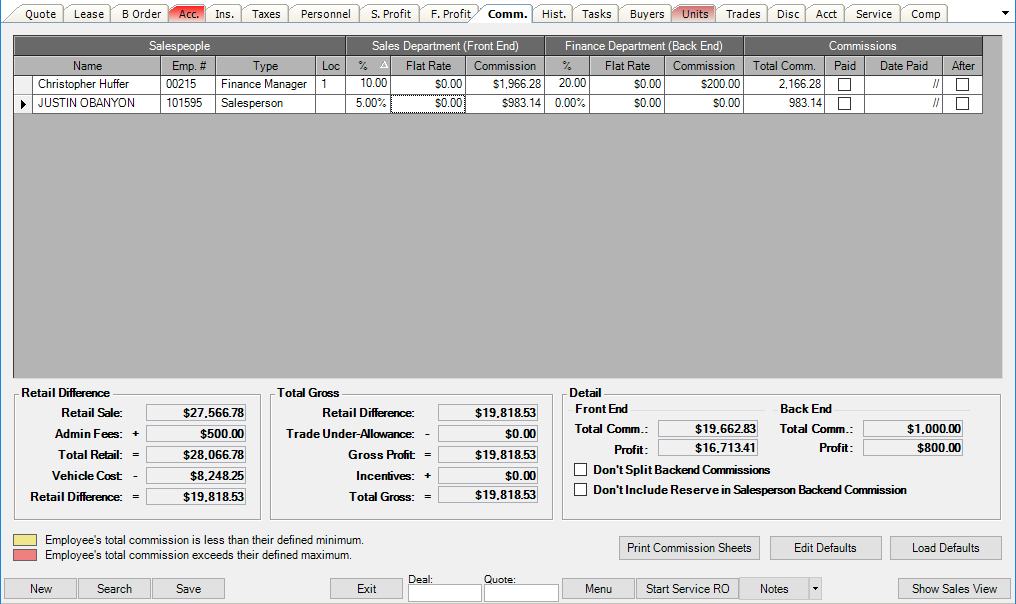
Commissions are split into Front End (Sales Profit) and Back End (Finance and Insurance Profit). Commissions may be Flat Rate or Percentage based. The Percentage is based on the total commission for each department.
If the after box is checked on a salesperson, that person will get their commission after the other people get their commission. This means that anyone with the after box checked will receive a lower commission, even if their percentage is the same.
Located in the bottom right hand corner of the commission tab is the Edit Defaults button. Clicking this button will open the Commission Defaults window, where you can set percentages, flat rates and limits for New, Used, Front End, and Back End profits per employee.
Once you have set up commission defaults, you can apply them to deals easily by selecting the Load Defaults button.
Personnel Tab
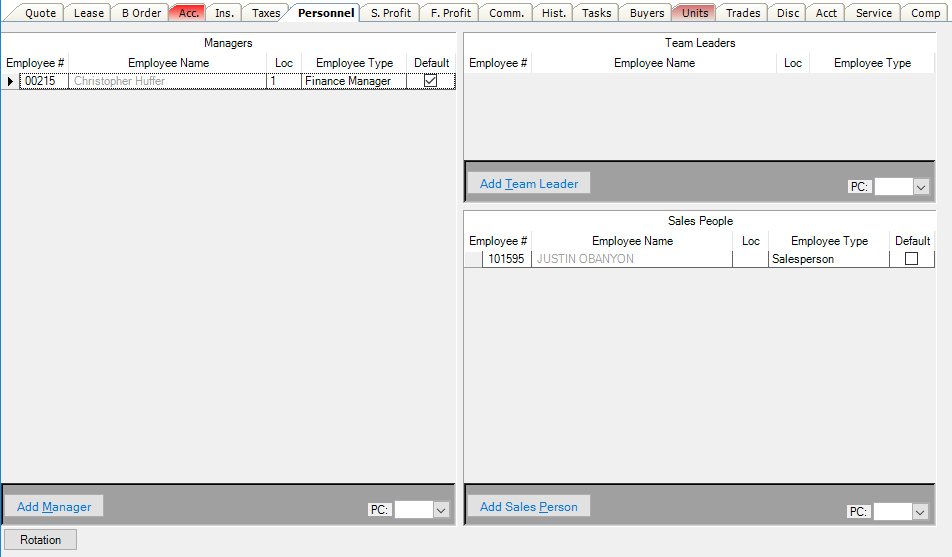
Add the managers, salespeople, and team leaders to the deal on the personnel tab. Employees must be entered here to show for commissions.
Service Tab
The service tab allows salespeople to review the internal service history on the units and trades on this deal. All the stock numbers associated with this deal including trades and units are displayed to the left. To view the service history, select the stock number on the left.
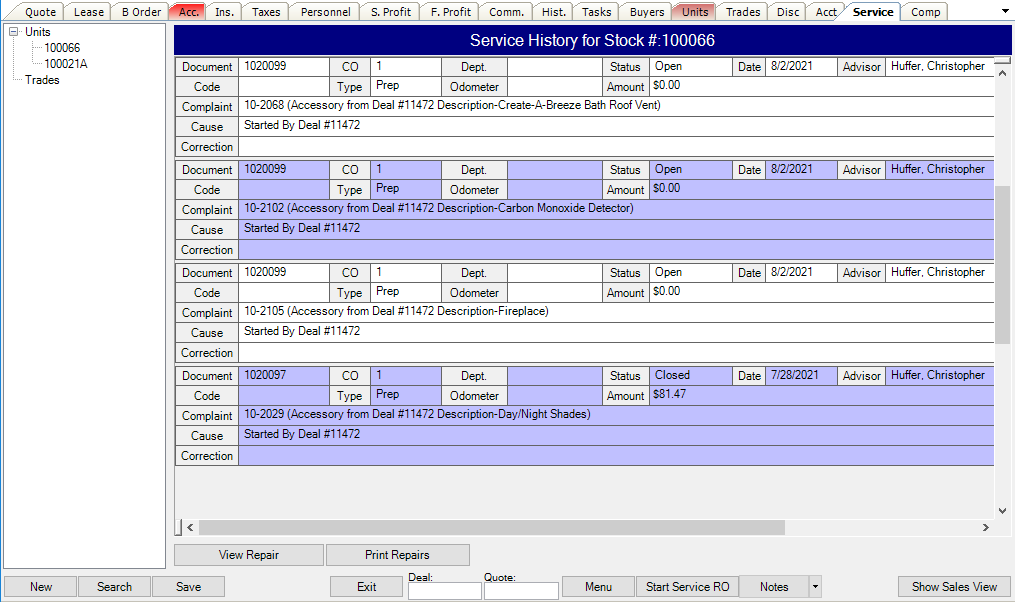
The Status column will show if the work order is Open or Closed. If the RO is open, that means work is still being performed, and the cost on the stock number may increase when the work order closes.
Scroll over to the right to see the Complaint, Cause and Correction. This detail shows details about the ROs in process. The amount column shows how much money will be applied to the cost when the work order closes.
Tasks Tab
The tasks tab allows you to create a new task associated with this deal and assign it to an employee.
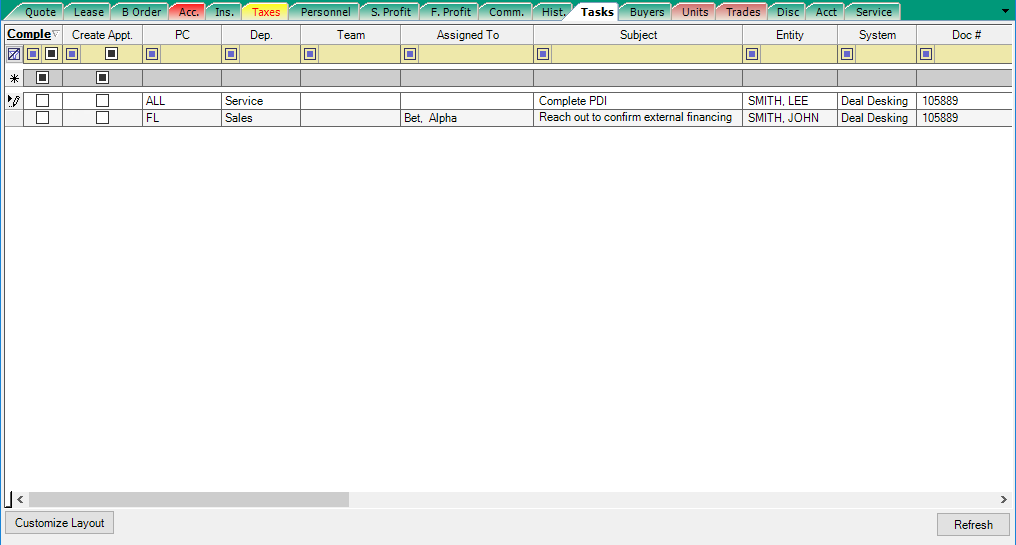
Click the Add New button to add a new, blank task record to the list. You must enter a Subject for the task. Choose an employee (including yourself) for the task to be Assigned To. Scroll to the right to add a Due Date. When the assigned employee logs in and checks their tasks on the Due Date, this task will appear.
History Tab
This tab shows every change made to the deal. This is a view-only tab and changes cannot be made here.
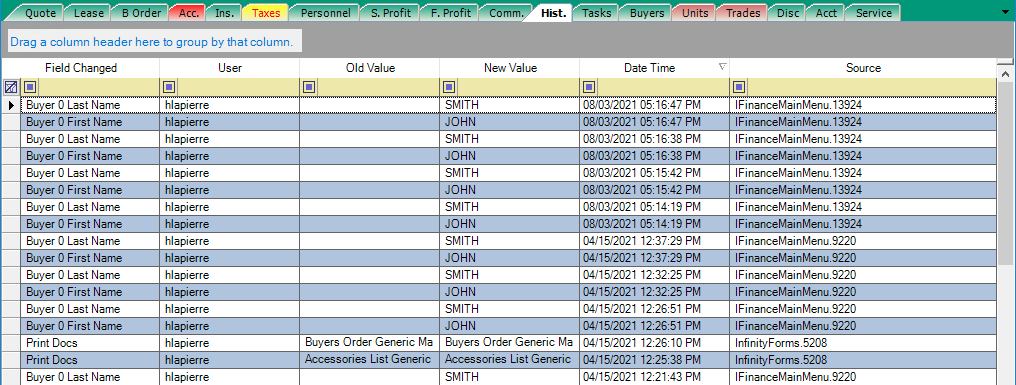
The Field Changed is the area of the deal where a change occurred. The User column shows the user who made the change. Old Value and New Value are sorted by date and time. Source indicates the module and session number used to make the change. For example, if the user made the change using Infinity Mobile, Source would indicate this.
To make use of the history, you will need to use the filters in the columns. For example, if you wanted to only see the history of admin, you would click the three dots icon next to User, go to Filter, and type admin in “Is equal to” and click Filter.
Finding a field can be difficult if you don’t know the exact name in the history. For example, you want to see when the stock number was changed. For this type of filter, you click the three dots icon over Field Changed, go to Filter, Change the filter to “Contains”.
Then you can type any part of the field name, in this case “stock”, and click Filter.